Baby Sun Hat

I have always wanted to make adorable baby hats. Babies wear hats all year long – fuzzy hats, wool hats, fleece hats, baseball hats, bucket hats, you name it! Hats keep their little heads warm but also protect them from the harmful effects of the sun.

This week I found a pattern that I will share my review of today. It’s Kwik Sew 3989 and it’s a really darling little hat. This hat can be made plain or with one of 4 flowers (pattern included). I decided to do plain because I was using a rather lively patterned fabric.

This hat took me about 40 minutes to make. In sewing terms, that’s “kwik” indeed! I love the hat pattern.

I made this in size L (the largest size, unfortunately) because it’s a gift for Connor’s friend who is turning 1 this week! Happy Birthday, Brooke!

I did lengthen the chin strap as well. It’s adjustable because it has a velcro closure, so you could also make it a little more snug. If the strap is too snug it may be uncomfortable for the baby or the Velcro may irritate their delicate skin.

My model today is a coffee tin.

This pattern was  easy and quick. The instructions were extremely easy to follow and I was able to make a second hat a little quicker than the first.

For this pattern you need 0.8 metres of fabric (0.5 metres for hat, 0.3 metres for lining), with 0.4 metres of interfacing, plus a very small piece of Velcro. If you’re an avid sewist there’s an excellent chance you can make this hat from scraps in your stash.

I will remake this hat soon in a more neutral print, and *possibly* do a couple for my son.

I hope you’ve enjoyed this pattern review. Happy Sunday!

Heather

DIY Bath Bombs

Just over a year ago I was preparing for my baby shower. Where does the time go?! My little boy will be 1 at the end of April. He’s aged one year, I’ve aged 5 years. My husband never ages.

Anyhow, I wanted to make something special as take-aways for my guests. I decided to make bath bombs and had 60 guests attending, so I ordered some of my supplies in bulk online, and picked up the rest at the local Bulk Barn.

I tried out a few different recipes before tweaking them and finding what worked best for me. This recipe, therefore, is a compilation of a bunch of other recipes. I’ve read (what feels like) a hundred bath bomb recipes so you don’t have to. You’re welcome!

Last night I hosted a bath bomb making party for a group of amazing Mom friends, so we snapped a few photos along the way (thanks, Tash!) in preparation for this post. Somehow we stopped goofing around long enough to get 7 batches of these made.

Materials:

  • Citric acid (I use Milliard brand found on Amazon)
  • Coconut oil
  • Baking soda
  • Cornstarch
  • Epsom salt (regular or scented work fine)
  • Essential oil (just one or mix a few together!)
  • Soap colouring (optional)
  • Metal mixing bowl
  • Bath bomb mold (more options described below)
  • Spatula
  • Measuring cup
  • Baking sheet for drying

When I started making these bath bombs I used our food processor to mix the ingredients, but I don’t do that anymore. Sure, it left a beautiful vanilla lavender scent in the bowl, but that’s only beautiful until you  make salsa….yuck!

Since then I’ve decided a metal mixing bowl is the way to go!

Here’s the recipe:

  • 1C citric acid
  • 1C baking soda
  • 1/2C coconut oil
  • 1/4C Epsom salts
  • 1/4C cornstarch
  • 8 drops of essential oil (if you’re using more than 1 oil, still use 8 drops total)
  • 10 drops of soap colouring (optional)

Start by melting the coconut oil in the microwave or in a saucepan. Once it’s melted, add your essential oil and soap colouring. Stir.

In a separate bowl, combine all of your dry ingredients.

Slowly add your wet mixture to the dry mixture, stirring as you go. If you see a lot of fizzing , you’re pouring too fast. Citric acid is the ingredient that creates the fizz, and it only fizzes once, so don’t let that be wasted in your mixing bowl.

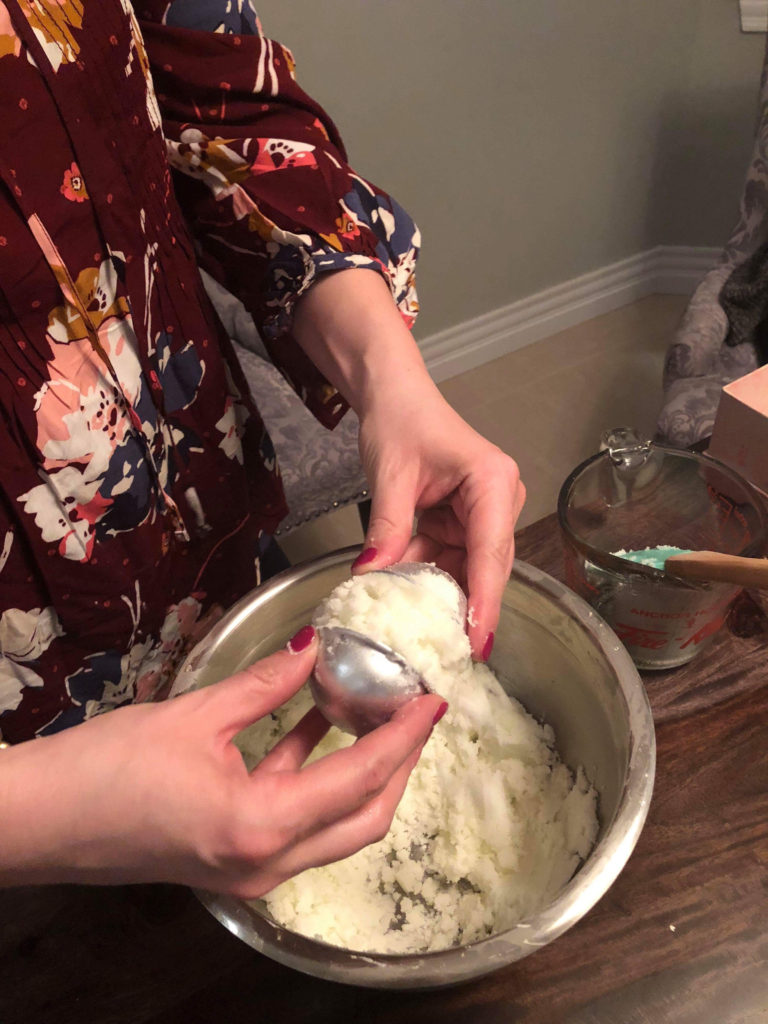
Once the ingredients are combined you are ready to form your bombs! Bath bomb molds come in many sizes and shapes. You can actually make bath bombs without a mold at all. Some people use ice cube trays, some use fillable Christmas bulbs, and I once actually just pressed mixture together in my hands as if I were making a snowball and it worked totally fine.

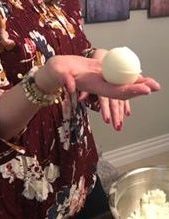
To fill your bath bomb mold, scoop mixture into each half of the mold, and press the halves together firmly. Ideally you want the mold a little overfilled so the mixture packs in the mold firmly.

At this stage you  may notice your mixture is too wet or too dry, both of which is completely fixable. If your mixture is too wet it will kind of “plop” out of the mold and turn into a wet puddle. If it’s too dry the halves won’t adhere to one another and you will get crumbling.

If your mixture is too wet, add small amounts of cornstarch (about a teaspoon at a time) until you get the right consistency. If your mixture is too dry, add a few drops of coconut oil. Typically there’s a bit left in the measuring cup after you’ve poured from it, so I just go back to that and it usually solves the problem.

Once the two halves of the bath bomb mold are stuck together, I gently twist each half in the opposite direction, back and forth a few times, until the mold kind of starts to lift away easily.

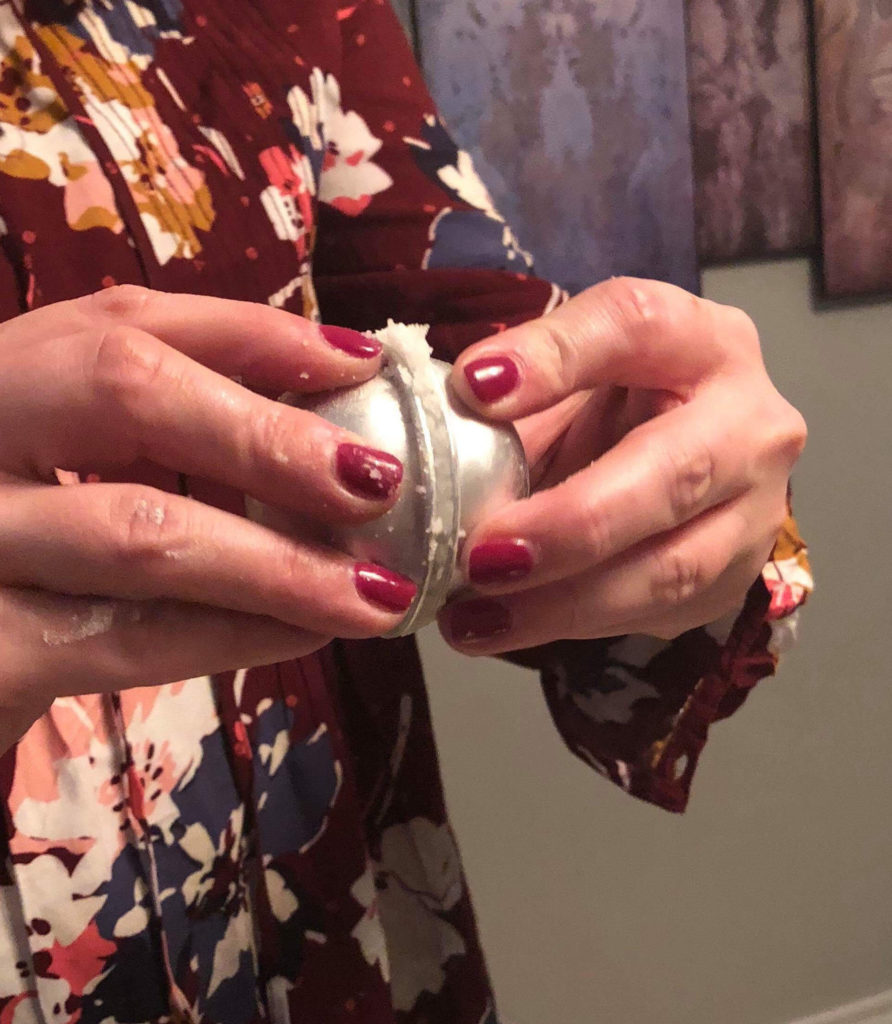
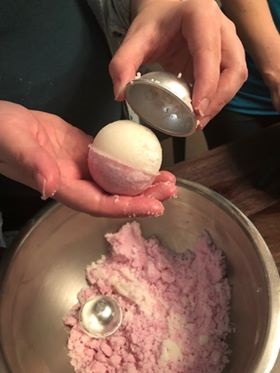
Your bath bomb should be pretty firm, but you want to handle with care. Lay the bomb gently on your cookie sheet and leave it to dry.

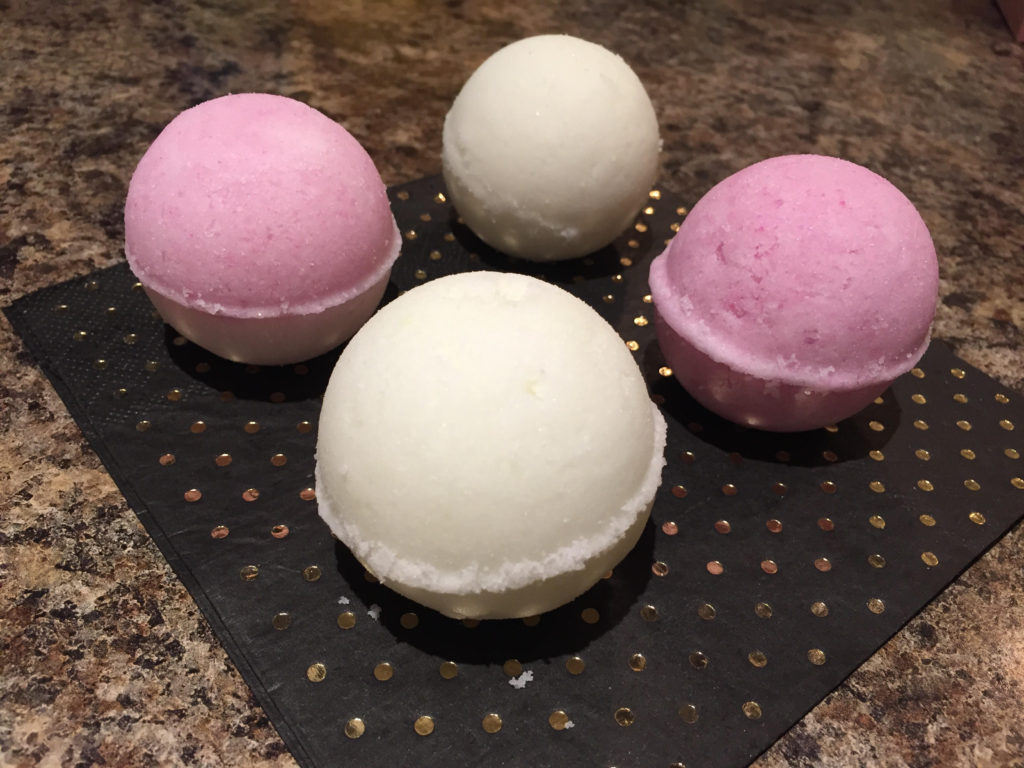
You will repeat this process until all of your mixture is gone. I typically get 6 medium sized bath bombs out of a batch, and have enough left over for 1 small bath bomb. You can also opt for the large size but this recipe will likely only give you 3 large, along with a medium or a small. I use these bath bombs regularly and feel the medium size is perfect.

Bath bombs should dry overnight (at minimum) before you take them off the cookie sheet. I try to leave mine for 48 hours before moving them. As these dry the scent of the essential oil will permeate the space, so you may want to put them out of the kitchen or eating area for the time being.

If you are giving these as a gift, or putting them in a decorative basket in your guest bathroom, there are a few ways to get a little creative with them! Here are a couple of options:

  • Make two-toned bath bombs! Before adding soap colouring to the coconut oil and essential oil mixture, separate into two cups. Add colouring to one cup and leave the other cup clear. Separate your dry mixture so you essentially have a white mixture and a coloured mixture. When you go to fill your mold, take half from the white and half from the coloured mixture. This method is super pretty!
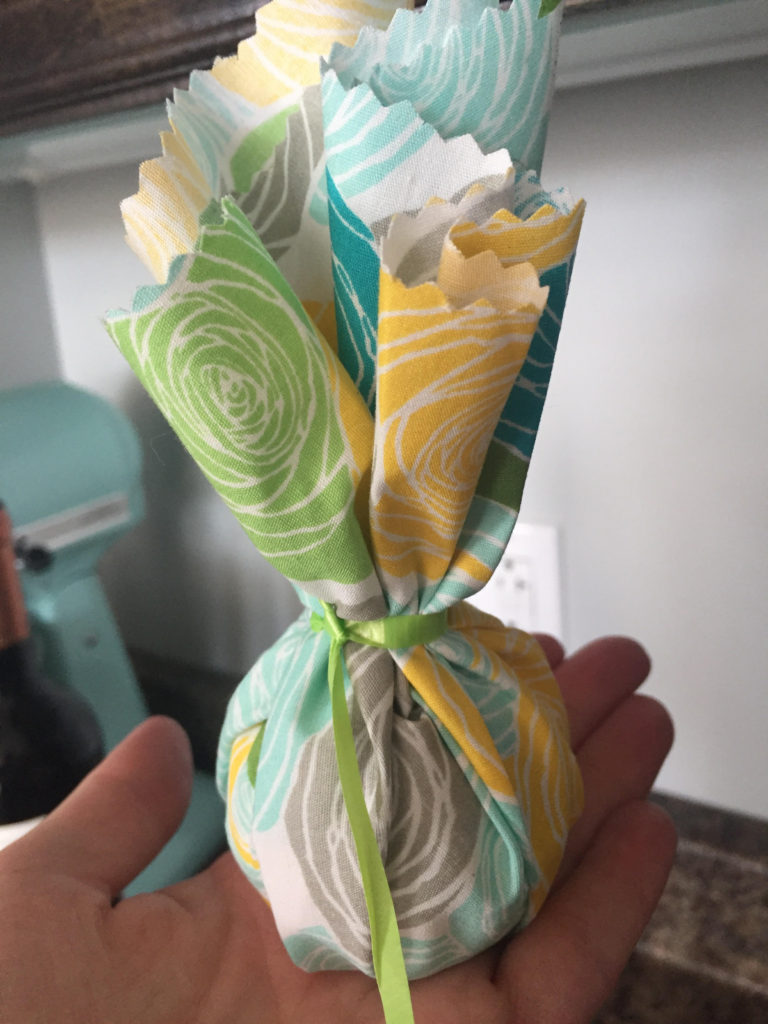
  • Wrap your bath bombs in either printed cotton or tissue paper, with a little ribbon as a tie. For a medium size bath bomb you want to cut about a 9X9 square of either, with a ribbon maybe about 6 inches long. You can use curly ribbon or regular ribbon, and for the cotton it’s best to use pinking shears.


I hope you’ve enjoyed this post and are now inspired to whip up these little gems. If you do try this out I would love to hear your thoughts on the recipe and tutorial.

Happy bathing!

Heather

DIY Tutu

Recently I had the tremendous pleasure of making a tutu for one of my favourite babies in the whole world. The occasion was her 1st birthday and I convinced her mama to let me take a crack at making an outfit for her photos. Amy, thanks for taking a chance on me!

I had a vision of a very full tutu with several shades of pink, but I also knew I wanted lots of texture! I decided to make a tutu with an elastic waist as opposed to a ribbon waist. Ribbon (specifically the bow) can be difficult to position properly on a squirmy baby for photos, so I played it safe.

I looked up measurements for a 12 month old baby girl and most people agreed that 15 inches seemed to be the average waist circumference, and a tutu 8 inches in length seemed appropriate. I headed on over to our local Fabricville store and found the perfect combination of tulle.

Materials:

  • 9m of assorted tulle
  • 17 inch strip of 1 inch elastic (white)
  • Needle & thread
  • Scissors
  • Measuring tape

I selected baby pink, bubblegum pink, dusty rose, gold and bubblegum pink flocked tulle. I got less of the dusty rose, flocked and gold as I knew those would be accent pieces. I used 9 meters of tulle in total, with very little left over, surprisingly.

I used 1 inch elastic and formed a loop, overlapping and stitching the ends together. The loop needed to be 15 inches when complete, so I cut 16.5 inches to allow a decent overlap. I used clips to hold it in place. I then stitched the overlap of the elastic together.

To make the tutu I would cut strips of tulle just over double the length I needed, as the tulle would fold in half over the elastic and would be looped in place. So I smoothed out the tulle and cut strips that were 6 inches wide by 16 or 17 inches long. I wasn’t too precise with this as I knew I could trim pieces when I was done. I forgot to get a photo of the gold once it was cut, but you get the idea.

Next I looped the elastic waistband over the lid of a container I had. Some people use cardboard, but you can use whatever you have.

To secure the tulle over the elastic I folded each piece in half. Lay the folded tulle flat against the elastic, wrap the cut edges around the elastic and pull through the loop at the top. Pull tightly to secure. Make sure you are wrapping in the same direction for each piece of tulle.

Once you’ve done this, the top view of your waistband will look like this:

The underside of the tutu will look like this:

I added the tulle fairly methodically, particularly when I was adding in the flocked, gold and dusty rose tulle. I wanted to ensure they were evenly spaced, so I roughly alternated colours.

Once it was done I took a final measurement of the waistband (as adding in a lot of fabric can make the elastic stretch) and laid the tutu flat for an inspection. I trimmed the longer pieces to ensure it was the proper length all around. If you do notice that your waistband has stretched, removing a few pieces of tulle evenly throughout the tutu will help.

The tutu ended up being exactly as full and textured as I had hoped. I loved making it and it took about 90 minutes in total, including the time it took to cut the tulle.

Happy 1st Birthday, little sweetheart!

Heather

Easy Easter Bib

This weekend is Easter and it’s my son’s first one! I can’t say he’s excited about the Easter Bunny, but mostly because he hardly knows what a bunny is.

Recently I learned to applique and I am completely in love with it. I literally want to applique everything I see! Pillows, tote bags, placemats, blankets, you name it.

Today I’m making an appliqued Easter bib.

I have used this bib pattern by Nana Company a number of times, so rather than reinventing the wheel, I will use this pattern. Here is the link: http://nanacompany.typepad.com/nanacompany/2014/03/the-classic-pretty-little-baby-bib-pattern-diy.html#comment-6a0147e2980363970b01a73d89e39b970d

Following Nana Company’s pattern, cut out the bib. I am using a scraps of fabric from my stash, so a simple cotton on the front and a flannel on the back.

To applique this bib you will need the following:

  • A small piece of contrasting fabric
  • Optional: A piece of white felt for a fuzzy bunny tail
  • A printed bunny silhouette (my husband drew the bunny by hand for this tutorial. Thanks, Matt!)
  • Heat’N Bond Lite
  • A threaded sewing machine (or a needle and thread if you’re into hand applique, which I am not)
  • A hot iron with the steam setting turned OFF (per Heat’N Bond Lite instructions)

Look at your bib and decide how big you want the bunny. Mine was roughly 3 inches high. Print the bunny silhouette to the appropriate scale. Cut a rectangular piece of fabric just slightly bigger than the measurements of your bunny, and cut a matching piece of Heat’N Bond Lite.

Do the same with the white felt for the bunny tail, if you are doing this step.

The best way I can describe applique is that you are essentially making a fabric sticker. So the wrong side of the fabric (not the patterned side) will face the webbed side of the Heat’N Bond Lite. When the fabric and Heat’N Bond are sandwiched together, the paper backing will be visible on one side and the (right side) printed fabric on the other.

Using your hot iron (again, no steam!) you will iron on the paper side of the Heat’N Bond, with the fabric underneath. Don’t press for too long, just a few seconds should do the trick. When in doubt, read the instructions on the Heat’N Bond Lite.

Let the paper cool for a few seconds before attempting to pick it up. Once it’s cool, you’re ready to cut out the silhouette.

You will trace the bunny onto the paper backing of the Heat’N Bond Lite. For this project it may not matter much, but if you were doing this with, for example, letters or numbers you would need to flip your template over before tracing so as to create a mirror image. Otherwise if you just trace directly onto the paper, you will have a backwards letter or number. You only make this mistake once or twice.

Cut out on your trace marks. You should now have a bunny silhouette with printed fabric on one side, paper backing on the other. Remove the paper backing and lay the silhouette on the front of your bib. Once you’re happy with the placement, iron over the top for a few seconds. This will secure the bunny to the bib. You’re now ready to applique.

On your sewing machine you should have several different stitches to choose from. I’m using the Janome Horizon Memory Craft 8200 (hello, dream machine!) and I use stitch number 39 for applique. I sometimes use contrasting thread for applique, but today I’m using matching thread.

I turn the sewing speed down when I applique to avoid going off course.

Once you have appliqued all the way around the silhouette (and around the tail, if you choose), snip the threads and get ready to sew the bib front to the bib back. I added a strip of ribbon across the bib before sewing the front to back.

You can follow Nana Company’s instructions for sewing the bib and attaching a snap closure. An alternative would be velcro, which I find easier and often more durable.

Once you’ve finished sewing the bib I would give it a quick press with the iron (this time with steam on to ensure the wrinkles are gone), and it’s ready to wear!

I also made an Easter bib for a friend of mine today. I’ve posted it below, just for another easy custom bib idea. I used felt for the pink square and the “e”. Appliqued around both.


Thanks for checking out my post today! I hope you enjoyed it. Hoppy Easter!!

Heather

Up, up and away!

Have you ever wished that a day had 28 hours instead of 24? When I’m in my craft room that’s a common wish of mine.

I’m Heather – wife, mother, crafter, HR professional and (now) blogger. I have a love for all things handmade (well, nearly all things), and I spend my waking hours dreaming of all the beautiful things I could make…if I only had more time.

My mom got me hooked on crafting when I was just 4 years old! She does it all – sewing, knitting, crocheting, rug hooking, you name it. Oh, and she’s really, really good. She has endless patience and will ravel something back or pick out stitches all day to make something right. That’s not characteristic of me, but she’s retired and has more time than I do. Maybe she will let me show you some of her work sometime.

So, why am I here? For years I have followed many craft blogs and I’ve had the pleasure of making projects from tutorials and patterns that other crafters have provided to the online community. I want to contribute to that community too. I want to share what I know, however little that may be.

I sincerely appreciate you stopping by to check out my blog. Hopefully a little something here catches your eye and you try it out.

Heather