DIY Memory Pillow

Happy Thursday! I’ve been absent for a couple of months while the busy holiday season was upon our household. I assure you, though, that doesn’t mean I wasn’t sewing.

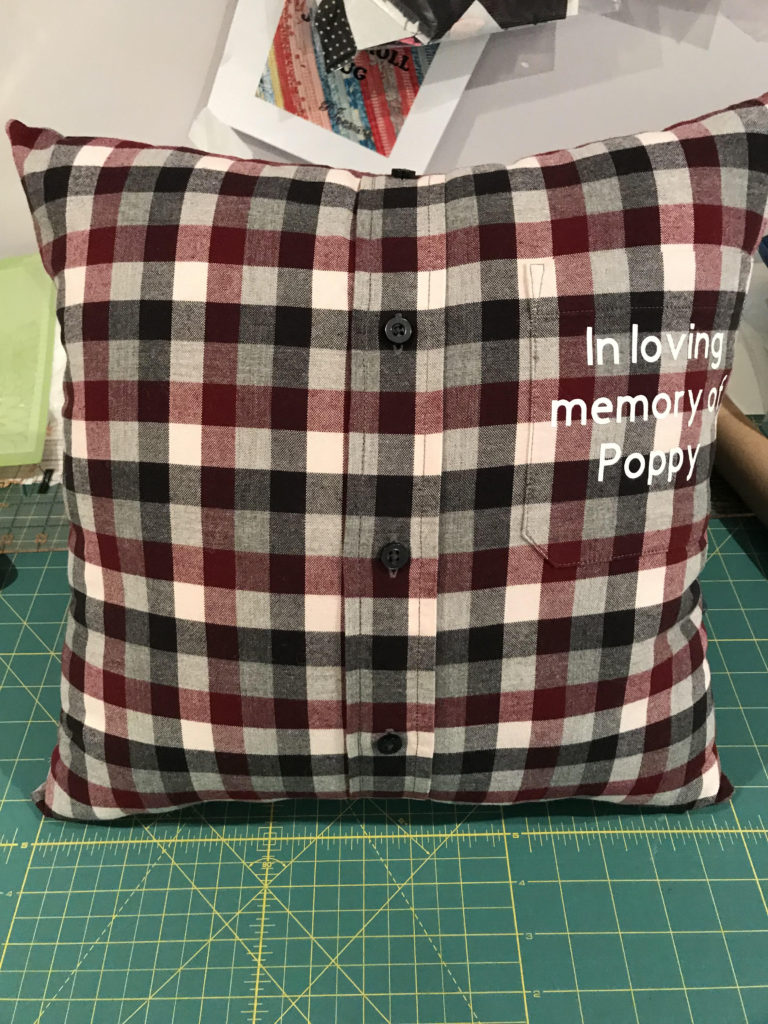
Today’s post is about a simple memory pillow I made back in December. Armed with a shirt, teddy bear stuffing (Loops and Threads is my brand of choice) and my Cricut, I whipped this up in about 45 minutes.

My sewing machine (Janome Horizon 8200) has text stitching capability but I don’t feel it’s one of the machines best features. The text is a little thin with not much variation, therefore I almost never use it.

Instead of hand embroidering, I decided to use my Cricut Explore to cut vinyl (iron-on) for the text on this pillow. The Cricut Explore is really easy to use and the this part only takes about 10 minutes. I measured the pocket (where I would place the vinyl) and that’s how I came up with the sizing. I used Cricut Design Space and a standard font, entered the text, cut the vinyl. Easy peasy.

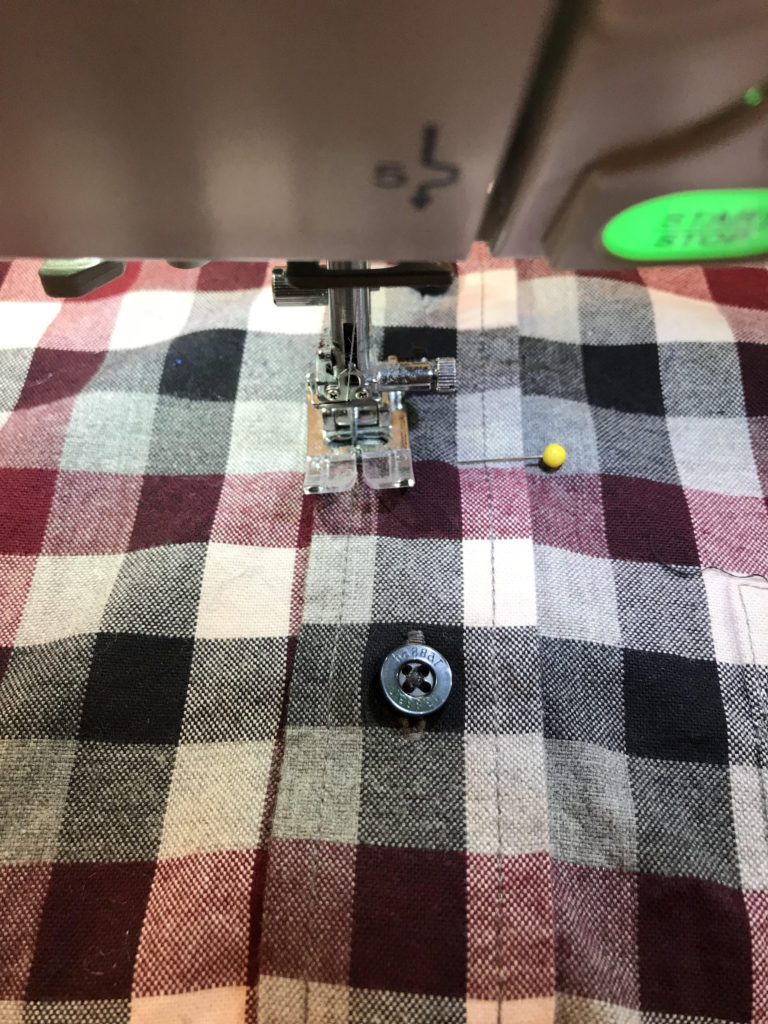
I started by pinning the front of the shirt together to keep it stable. Without pinning, you can get pulling in the fabric which can cause uneven cuts. Probably most important here where the fabric is an obvious plaid.

Next I took the shirt and cut off the sleeves and collar. I did so sparingly, though, because the shirt was not overly big and I wanted a finished pillow about 16″ X 16″. Once the sleeves and collar were gone, I took the buttoned halves apart and pressed each piece until all wrinkles were gone.

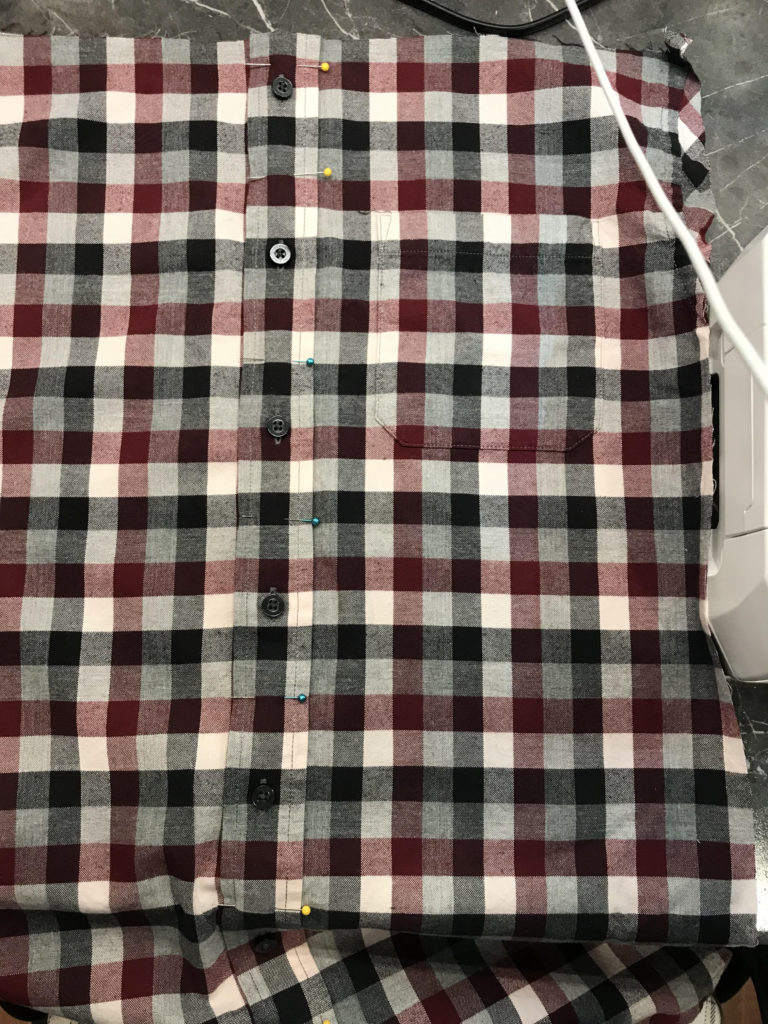
I stitched carefully down the front of the shirt, securing the two pieces together at the button column. This is important so the pillow doesn’t open up once stuffed!

Next I was ready to adhere the vinyl lettering to the pocket of the shirt. I had not anticipated how difficult this would be. I have used Cricut vinyl many times on shirts, but this shirt was a thicker fabric. I heated up the fabric with the hot iron, placed the vinyl down, ironed over the clear plastic backing, lifted gently but the vinyl didn’t adhere. I repeated this process several times before almost deciding it wasn’t going to work. Eventually I left the iron in place longer, then once the iron was removed I took the shirt over to a firm surface and pressed the clear backing into the fabric, being careful not to burn myself. Because the vinyl was quite hot, this worked better than simply ironing over the clear backing.

Once the lettering had cooled I cut the front and back of the shirt the same size, which was roughly 17.5″ X 17.5″. I put the right sides of the fabric together (wrong sides facing out), pinned together and left about a 6 inch opening along the bottom (middle) of the pillow.

I stitched around the edges, then turned the “pillowcase” right side out through the 6 inch opening. Now it’s time to fill the pillow! I always start by putting small amounts of stuffing in each of the 4 corners of the pillow. I used teddy bear stuffing for this as it’s quite soft and squishy, which is perfect for hugging when you’re missing your favorite person and only have their shirt to hug.

Once I had the pillow filled evenly, I overstuffed the pillow around the 6 inch opening. I then tucked in the edges of the opening and hand stitched it together.

Now the pillow is stuffed, stitched and ready to gift!

This is a quick project but a meaningful one. A lovely gift for a person who’s missing a loved one.

If you don’t have a Cricut and aren’t in the mood to embroider, you could also skip the text and just make the pillow. Another option is to put a note or a card in the pocket.

I hope you enjoyed today’s tutorial. Thanks for stopping by!

Heather

DIY Birthday Shirt

Leading up to Connor’s birthday party I was looking at options for a fun birthday tshirt! My husband lives in baseball-style shirts so I thought it would be cute to dress him up in one of those.

I picked up the shirt from the sale rack at Old Navy for about $5.

I decided to test out my applique skills for this project, knowing it would be a bit more involved than what I’ve done in the past. I enlisted the help of my darling husband as he has mad drawing skills. We looked at how big the monster should be (based on how big the shirt was), and started to plan out the project.

We looked up some images on Google for monster birthday shirts and came across a design we loved. This is not our original idea, though Matt did draw it by hand. Within a few minutes he had drawn this little guy:

To applique this, he had to cut out (from paper) all of the layers separately to make a pattern, so first he cut the body (with arms attached), then the horns, then the eyes, then the mouth, then the teeth. We spent some time coming up with the best color scheme for the monster.

Then he cut out the letters (from paper) for “one” and we chose fabric to match the monster.

Here are the materials you will need for this project:

  • A paper pattern (you can create your own)
  • Heat’N Bond Lite
  • Coordinating fabric
  • Scissors
  • Contrasting or coordinating thread
  • Iron
  • Lightweight interfacing (optional but helpful)

Once your pattern is cut out of paper you will want to iron the Heat’N Bond Lite to the back of the fabric per the instructions on the package.

Use your pattern pieces to cut out the fabric pieces.

Position the monster body on the shirt where you think it best fits. Position the letters for “One” underneath. Once you’re happy with the placement, peel the backing off of the Heat’N Bond Lite and make sure the steam setting is turned OFF on your iron. Iron these pieces in place.

Next you will add on the horns, the white part of the eyes and the mouth. Press those in place.

At this stage I would cut a piece of interfacing and place on the inside of the shirt. This is optional, however if the shirt fabric is really stretchy or flimsy, a little stabilizer on the back does help with the applique, especially when going around the tiny little monster fingers.

Before adding on the pupils and the teeth, applique all of those pieces in place. To applique you can use either a very small, tight zigzag stitch on your machine or a regular applique stitch. The zigzag may be best if this is an item you plan to wash and wear often, as the zigzag will be best at preventing fraying over time. But this shirt was to be worn once and then put in a memory box for Connor, so I went with the traditional applique stitch. On my Janome Horizon Memory Craft 8200 it’s stitch 39.

Once you’ve appliqued all the way around these pieces (using either a contrasting thread or a matching thread), you can iron the pupils and teeth in place as pictured here:

Applique the last pieces added.

Give the shirt a good press with your iron and it’s ready to wear! I did throw this one through the washer to soften up the appliqued fabric a bit before wearing.

This project can take a little time, maybe 90 minutes or so. But the result was so darn cute I would do it all over again!

Thanks for checking out my post.

Heather

DIY High Chair Banner

There’s something SO adorable about a little baby sitting in a high chair munching on cake. Of course the trend these days is to dress up that high chair with a banner or a garland.

For Connor’s monster themed party I decided to do a really fun high chair banner. I headed to Fabricville and hit up the sale rack, scoring a great deal on some really adorable printed cottons. I also picked up some inexpensive broadcloth in complementary colors.

Here are the materials needed for this tutorial:

  • 2.5 metres (total) of cotton and/or broadcloth
  • 1/4 metre of fabric for hanging banner
  • 1/4 metre of fabric for back of hanging banner (optional)
  • Scraps of fabric (cotton, broadcloth, felt, denim) for applique on banner
  • 6ft piece of twine
  • Pinking shears
  • Scissors
  • Heat N’Bond Lite (for applique on banner)

If you just want to make a garland (without the hanging banner in the centre) you don’t need the Heat N’Bond Lite, scraps of fabric, or either of the 1/4 metres of fabric.

To start I strung a piece of twine (roughly 7-8ft long, which is way longer than it needed to be) and tied each end to handles on my cabinets. This will make it easier to loop the cotton pieces.

First you should iron all of your fabric. I forgot to do this somehow and ended up ironing each piece of fabric individually. Hello, time waster!

Once your fabric is ironed you will cut strips of fabric 3 inches wide by 42 inches long. If you have a rotary cutter, ruler and cutting mat this is a breeze. But it can easily be done with scissors as well. It doesn’t have to be exact. I did more of the fun prints and fewer of the solids.

Cut 28 strips in total.

Once all of your strips are cut, fold each piece lengthwise and cut the ends with pinking shears. Here are a few options for the ends:

  • Cut straight across
  • Cut on a diagonal
  • Fold fabric in half and cut a diagonal, making a V shape once the fabric is opened up again (pictured)

If you’re making a hanging banner you will want to cut out two pieces of fabric (from your 1/4 metre pieces) that will be 17 inches long by 9 inches wide. Iron these pieces of fabric and set aside.

Take your scraps of fabric and attach to the Heat N’Bond Lite per the instructions on the package. Take a look at the fabric and decide how large you want the applique design. In the appropriate size, cut out the numbers, shapes, letters, etc that you want on your banner. I did the number “1” and the monster freehand but you can certainly trace something if you’re more comfortable.

Place both pieces of 9X17 fabric together, right sides facing out, and turn down one of the short ends (one of the the 9 inch ends) about 1/2 an inch. Press. Turn down again and press. Using a straight stitch, stitch along the first folded edge to form a pocket for the twine to go through.

Next you will want to attach the applique designs to your hanging banner per the instructions on the Heat N’Bond Lite. Always make sure you are turning off the steam setting when using applique paper.

Once the design is placed and pressed on, you are ready to applique. I have a Janome Horizon Memory Craft 8200 sewing machine and I use stitch number 39 for applique.

Separate the two layers of the hanging banner. You want to applique only the front piece, as the back piece will later get attached to hide all of the threads and make the project look neater.

Stitch along the outer edge of all applique pieces using either a contrasting thread or a matching thread.

Place both 9X17 pieces of fabric together. The bottom edge can be left straight or you can repeat the “V” pattern that I did on the bottom edge of the cotton pieces.

Next I did a zigzag stitch along the perimeter of the banner, stitching the front and back pieces together. I did not stitch over the ends of the pocket where the twine will thread through.

Once the perimeter is stitched, I used my pinking shears to clip the edges, just for texture.

String the twine through the pocket of the banner. If you are having difficulty with this, I recommend wrapping the twine around one side of a safety pin a few times, then threading the safety pin through the pocket.

Centre the banner along the twine.

You are now ready to string on all of those beautiful pieces of cotton and/or broadcloth! This is my favorite part.

You will use the same technique for this project as you would from my DIY Tutu tutorial. If you go to this video you will get an excellent demonstration of the looping technique at about 3mins 30secs.

Continue looping evenly on either side of the hanging banner. I made each side a mirror image of the other, but you can do it more randomly.

Once you’ve added in all of your pieces, you are done! Your high chair is ready to party!

This is such an easy project, especially if you are simply making a garland and skipping the hanging banner in the centre. You can use any color combination you like.

Thanks for checking out my post! Happy Monday!

Heather

Easy Easter Bib

This weekend is Easter and it’s my son’s first one! I can’t say he’s excited about the Easter Bunny, but mostly because he hardly knows what a bunny is.

Recently I learned to applique and I am completely in love with it. I literally want to applique everything I see! Pillows, tote bags, placemats, blankets, you name it.

Today I’m making an appliqued Easter bib.

I have used this bib pattern by Nana Company a number of times, so rather than reinventing the wheel, I will use this pattern. Here is the link: http://nanacompany.typepad.com/nanacompany/2014/03/the-classic-pretty-little-baby-bib-pattern-diy.html#comment-6a0147e2980363970b01a73d89e39b970d

Following Nana Company’s pattern, cut out the bib. I am using a scraps of fabric from my stash, so a simple cotton on the front and a flannel on the back.

To applique this bib you will need the following:

  • A small piece of contrasting fabric
  • Optional: A piece of white felt for a fuzzy bunny tail
  • A printed bunny silhouette (my husband drew the bunny by hand for this tutorial. Thanks, Matt!)
  • Heat’N Bond Lite
  • A threaded sewing machine (or a needle and thread if you’re into hand applique, which I am not)
  • A hot iron with the steam setting turned OFF (per Heat’N Bond Lite instructions)

Look at your bib and decide how big you want the bunny. Mine was roughly 3 inches high. Print the bunny silhouette to the appropriate scale. Cut a rectangular piece of fabric just slightly bigger than the measurements of your bunny, and cut a matching piece of Heat’N Bond Lite.

Do the same with the white felt for the bunny tail, if you are doing this step.

The best way I can describe applique is that you are essentially making a fabric sticker. So the wrong side of the fabric (not the patterned side) will face the webbed side of the Heat’N Bond Lite. When the fabric and Heat’N Bond are sandwiched together, the paper backing will be visible on one side and the (right side) printed fabric on the other.

Using your hot iron (again, no steam!) you will iron on the paper side of the Heat’N Bond, with the fabric underneath. Don’t press for too long, just a few seconds should do the trick. When in doubt, read the instructions on the Heat’N Bond Lite.

Let the paper cool for a few seconds before attempting to pick it up. Once it’s cool, you’re ready to cut out the silhouette.

You will trace the bunny onto the paper backing of the Heat’N Bond Lite. For this project it may not matter much, but if you were doing this with, for example, letters or numbers you would need to flip your template over before tracing so as to create a mirror image. Otherwise if you just trace directly onto the paper, you will have a backwards letter or number. You only make this mistake once or twice.

Cut out on your trace marks. You should now have a bunny silhouette with printed fabric on one side, paper backing on the other. Remove the paper backing and lay the silhouette on the front of your bib. Once you’re happy with the placement, iron over the top for a few seconds. This will secure the bunny to the bib. You’re now ready to applique.

On your sewing machine you should have several different stitches to choose from. I’m using the Janome Horizon Memory Craft 8200 (hello, dream machine!) and I use stitch number 39 for applique. I sometimes use contrasting thread for applique, but today I’m using matching thread.

I turn the sewing speed down when I applique to avoid going off course.

Once you have appliqued all the way around the silhouette (and around the tail, if you choose), snip the threads and get ready to sew the bib front to the bib back. I added a strip of ribbon across the bib before sewing the front to back.

You can follow Nana Company’s instructions for sewing the bib and attaching a snap closure. An alternative would be velcro, which I find easier and often more durable.

Once you’ve finished sewing the bib I would give it a quick press with the iron (this time with steam on to ensure the wrinkles are gone), and it’s ready to wear!

I also made an Easter bib for a friend of mine today. I’ve posted it below, just for another easy custom bib idea. I used felt for the pink square and the “e”. Appliqued around both.


Thanks for checking out my post today! I hope you enjoyed it. Hoppy Easter!!

Heather