When a loved one passes, many people search for ways to keep them close – whether it’s keeping ashes in an urn on their fireplace, or maintaining a space in their home for treasured belongings.
Enter: the Memory Bear.
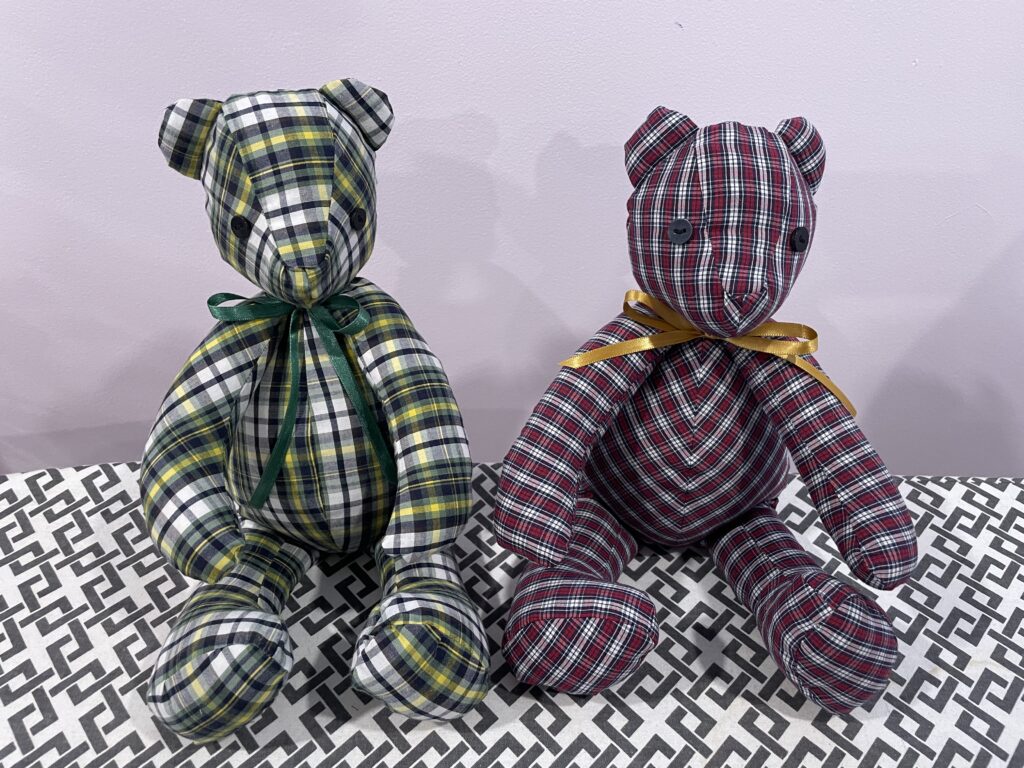
Memory bears are made from garments of loved ones who have passed are incredible keepsakes. Over the years, I’ve made stuffed animals, but I’d never been content with the outcomes.
This pattern was easy to follow, and the video was very helpful. I was very pleasantly surprised at the outcome, and the bears are just adorable.
The materials I used for this project are:
A shirt in good condition, washed and dried
Stuffing (I used approximately 3 oz per bear)
Needle and thread
Pattern pieces
Small buttons (for eyes)
Ribbon (for the neck)
I started out by disassembling the shirt – removing sleeves, removing seams, buttons, etc. I used the sleeves (cut open and laid flat), the back of the shirt and part of the front of the shirt. Be mindful to avoiding using stained or ripped fabric.
Cut out the pieces, and set them all aside. Assemble per the instructions in the pattern.
I used small buttons for the eyes (you can even use the buttons from the shirt, if it’s a button-up shirt!). I finished the bear with a coordinating ribbon around the neck, to dress it up a bit.
The bear took just over an hour to create. If you’re into embroidery, one suggestion would be to embroider a message or name on the bear, perhaps on one of the soles or the chest of the bear.
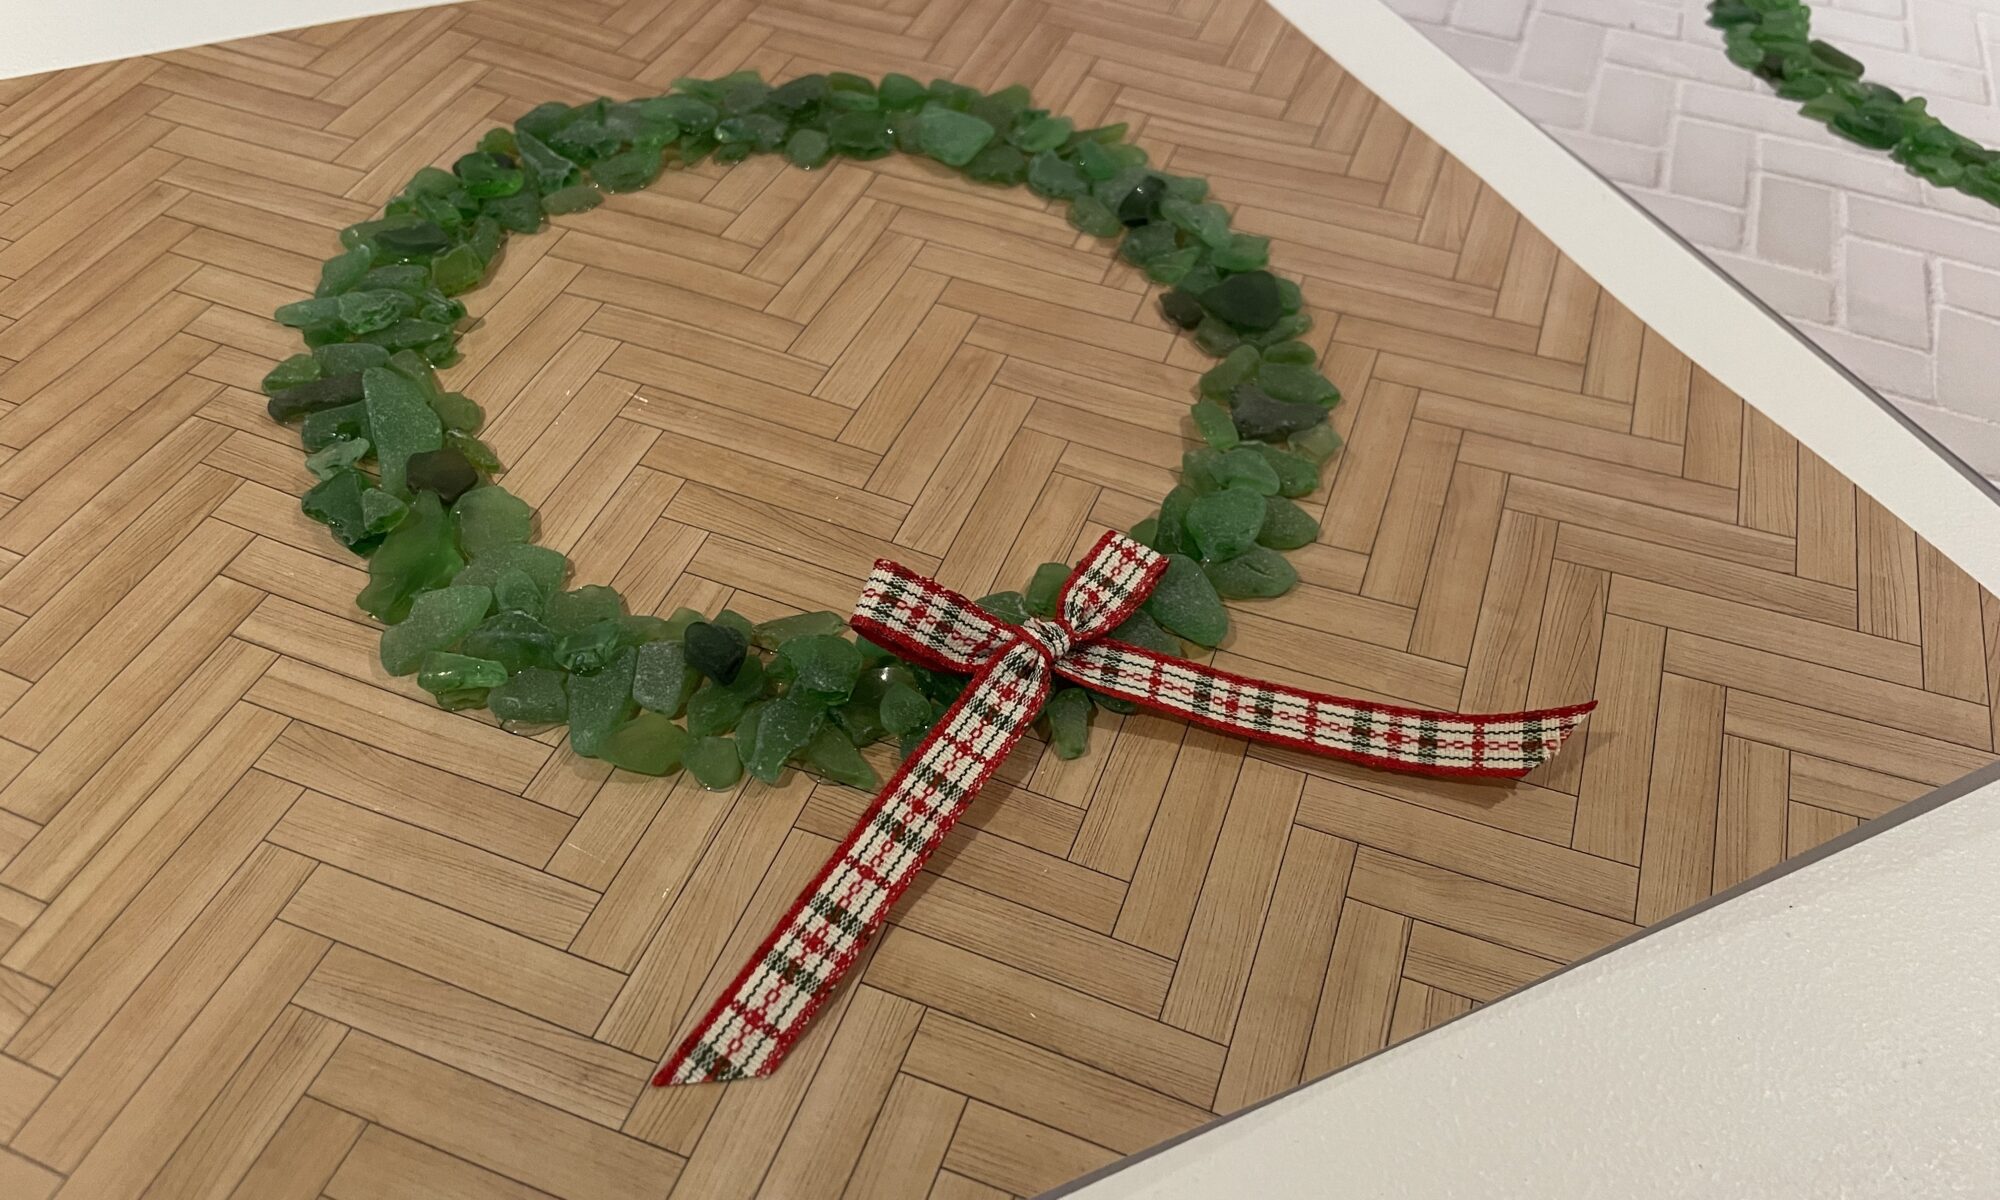
This tutorial was requested by a friend, and I am happy to share what I’ve learned about making these beautiful, eye-catching Christmas wreaths.
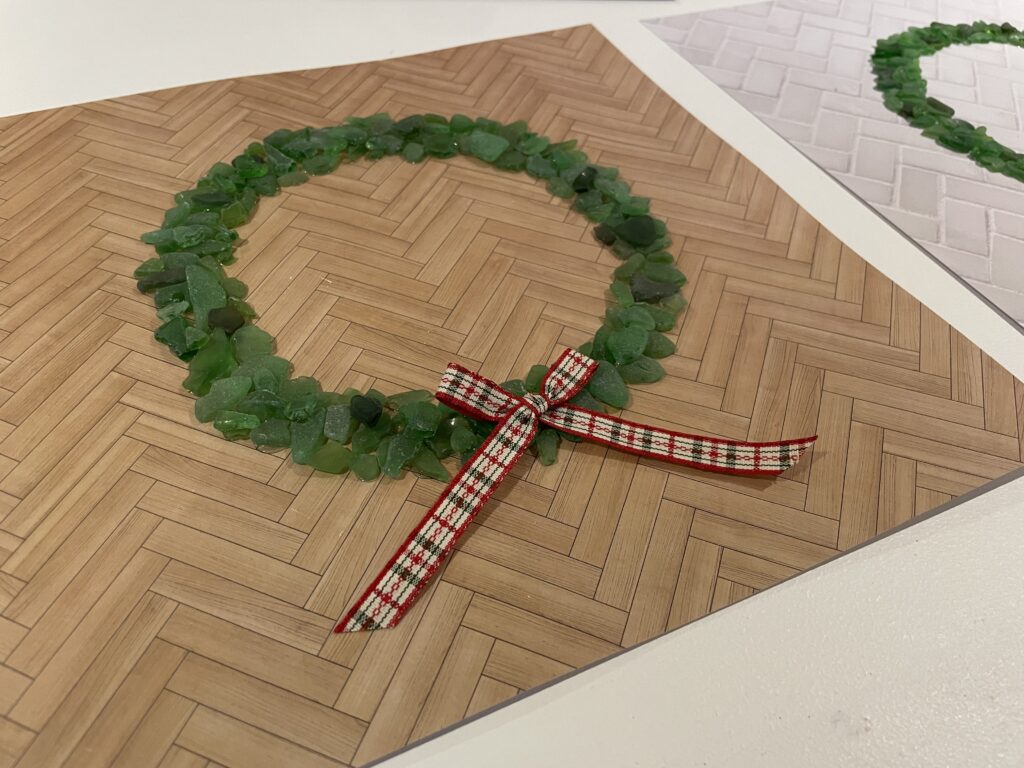
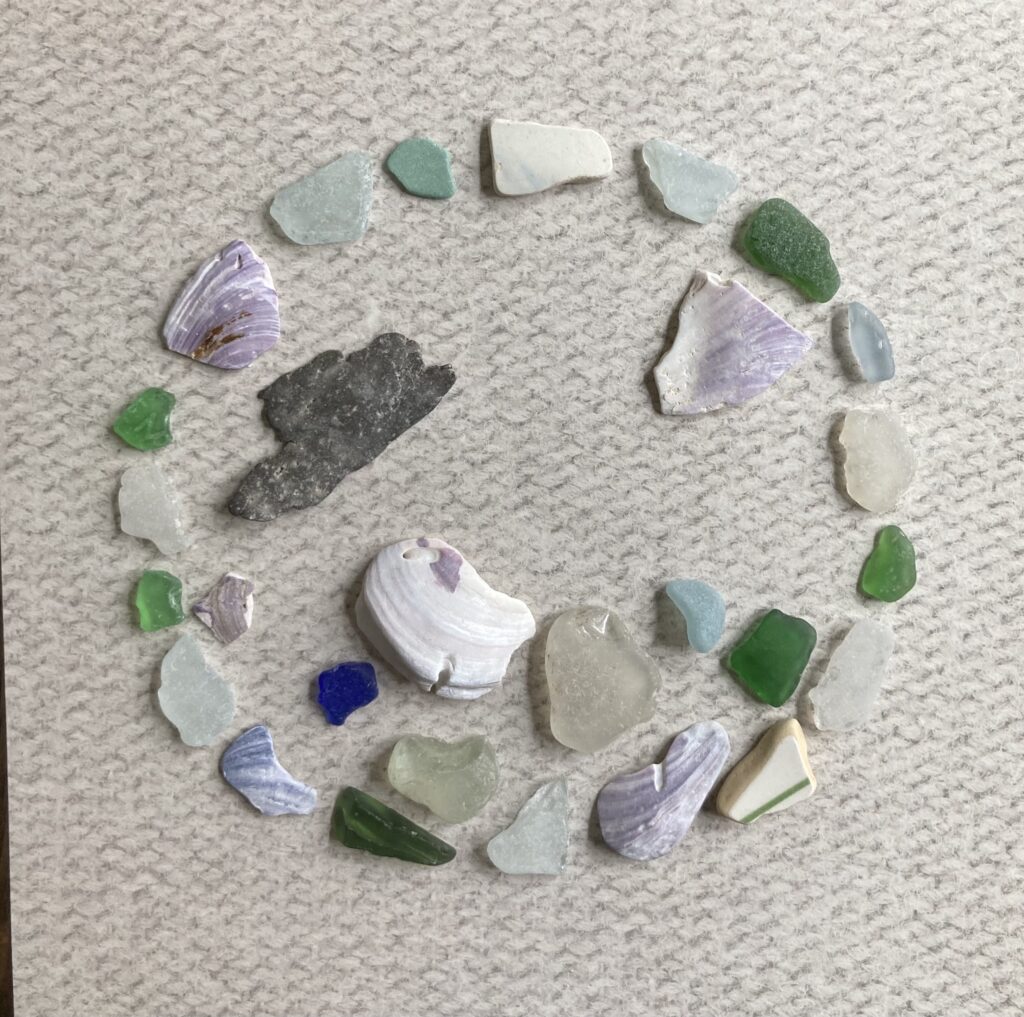
To start, you must have a decent stash of green seaglass. You will utilize some larger pieces (think: the size/width of a toonie), as well as many small pieces. Various shades of green really give these wreaths dimension.
In 2021 I made these wreaths for the first time, and the response was incredible. I shared as my own creation, but quickly I had people requesting them for gifts for their parents, friends and coworkers.
This year I’ve moved forward with a plan to make (and sell) about 20 of these wreaths for the Christmas season. I’ve been gathering green glass all year for this!
The materials you will need for this project are as follows:
Cardstock
Shadowbox frame
Green seaglass
E6000 glue
Ribbon
Circular object for tracing
Pencil
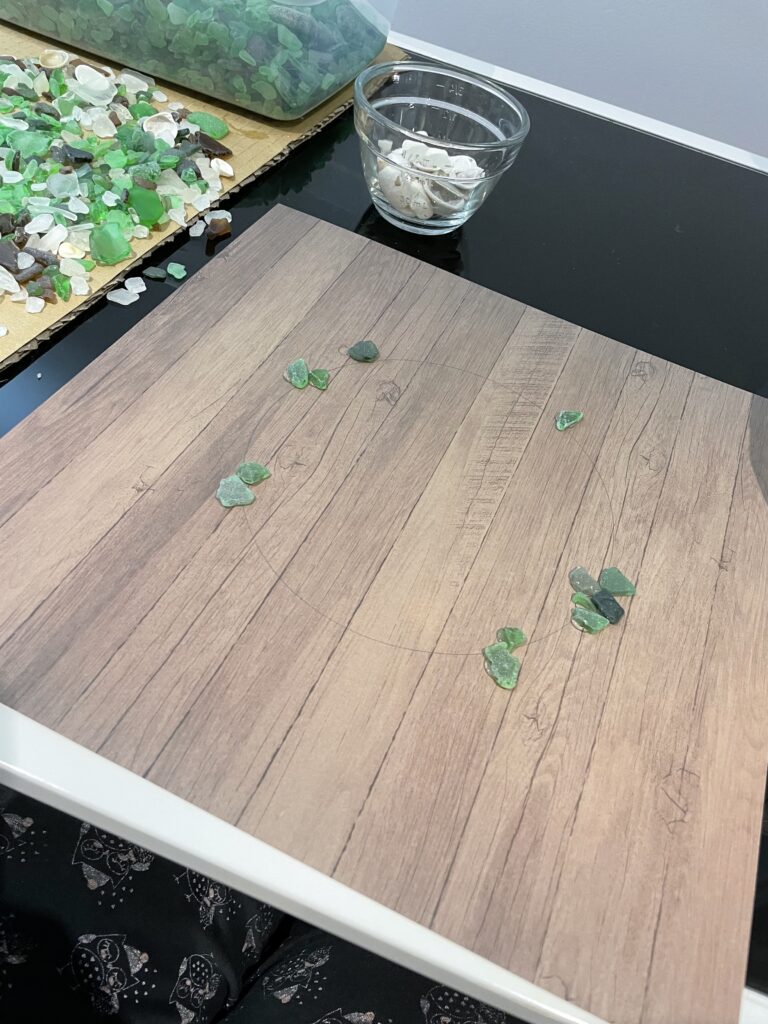
As always, we start with clean glass. I use a bleach solution to clean seaglass. I soak the glass for at least a few hours, rinse well and lay on a towel to dry. Then I store it in containers for use.
Your cardstock will need to be cut to fit your shadowbox. I recommend you always do this step before gluing anything onto the cardstock, as it can be very difficult to cut once your project is done. I use a Fiskars paper cutter to cut my cardstock, as it makes for a very straight edge.
I take a large circular object and trace gently with a pencil. Dark marks can be difficult to fully cover up with glass, so I do recommend a light outline, and I do not recommend pen or markers for the outline. (You’ll only make that mistake once!)
Do your best to center the circle (horizonally and vertically) on your page. Sidenote: you might notice the photos here are from different wreaths. I’ve made so many this season, I just snapped photos at random 🙂
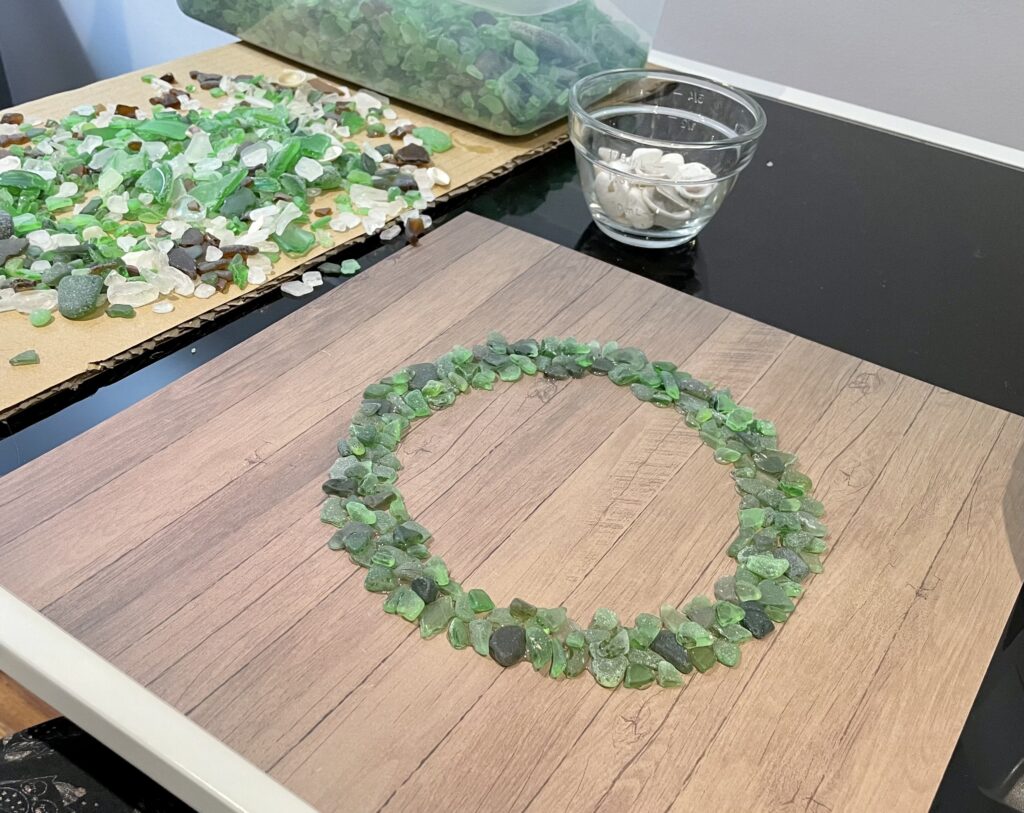
To start the base for your wreath, you can use larger pieces for the main outline. I like to place glass above and below the markings, as I enjoy the look of a slight fuller wreath.
I tend to choose glass with “points” and face the points outward or inward, to give the appearance of branches. The adhesive isn’t fast-drying, so you can move pieces around slightly if needed.
Once you’ve completed the outline, you will want to layer some pieces of glass over the top of the other glass, to add dimension. This is where various shades of green will really come in handy!
Once you are done layering glass, you should leave the cardstock in place for up to 24 hours before attempting to frame it. As I said, E6000 does not dry down immediately, so you want to ensure all pieces are given proper time to dry so they don’t shift.
Next you will make a bow for your wreath. I use double-sided ribbon, and I definitely love the traditional Christmas prints (ie. plaids).
Cut a piece of ribbon to about 12″, and tie it into a tidy bow. The ends of the ribbon should be cut on a 45 degree angle.
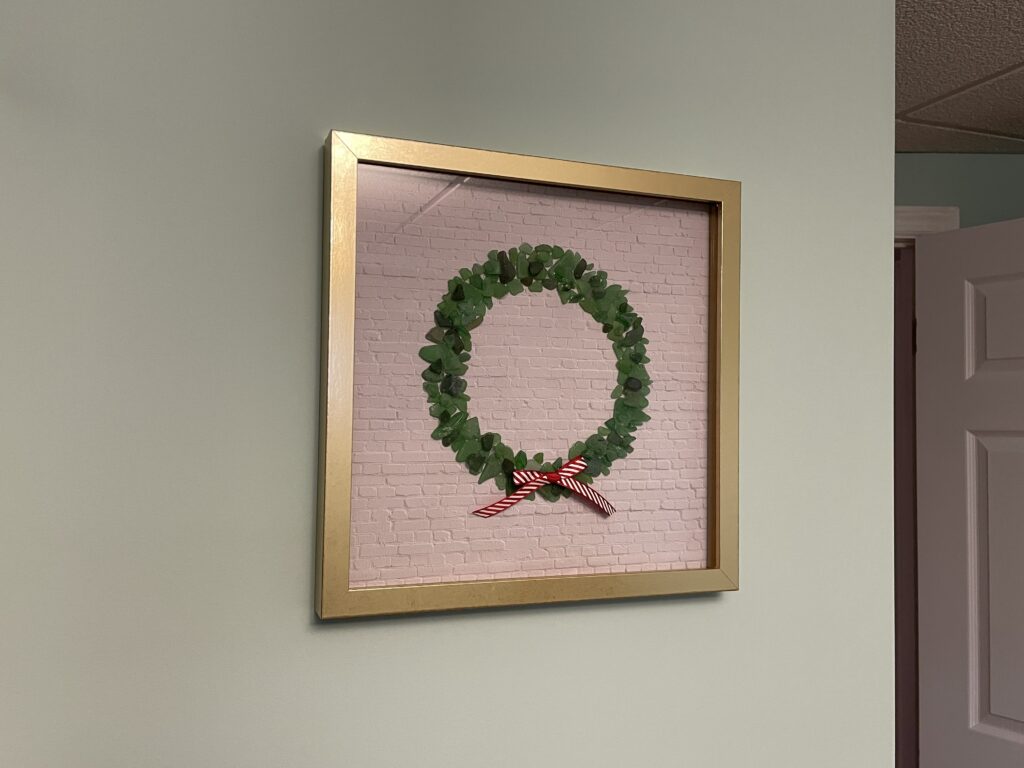
Place some E6000 on the backside of the ribbon (knot), and lay in place. I normally put the bow on the bottom of the wreath, but I’ve done the top as well and it looked sweet.
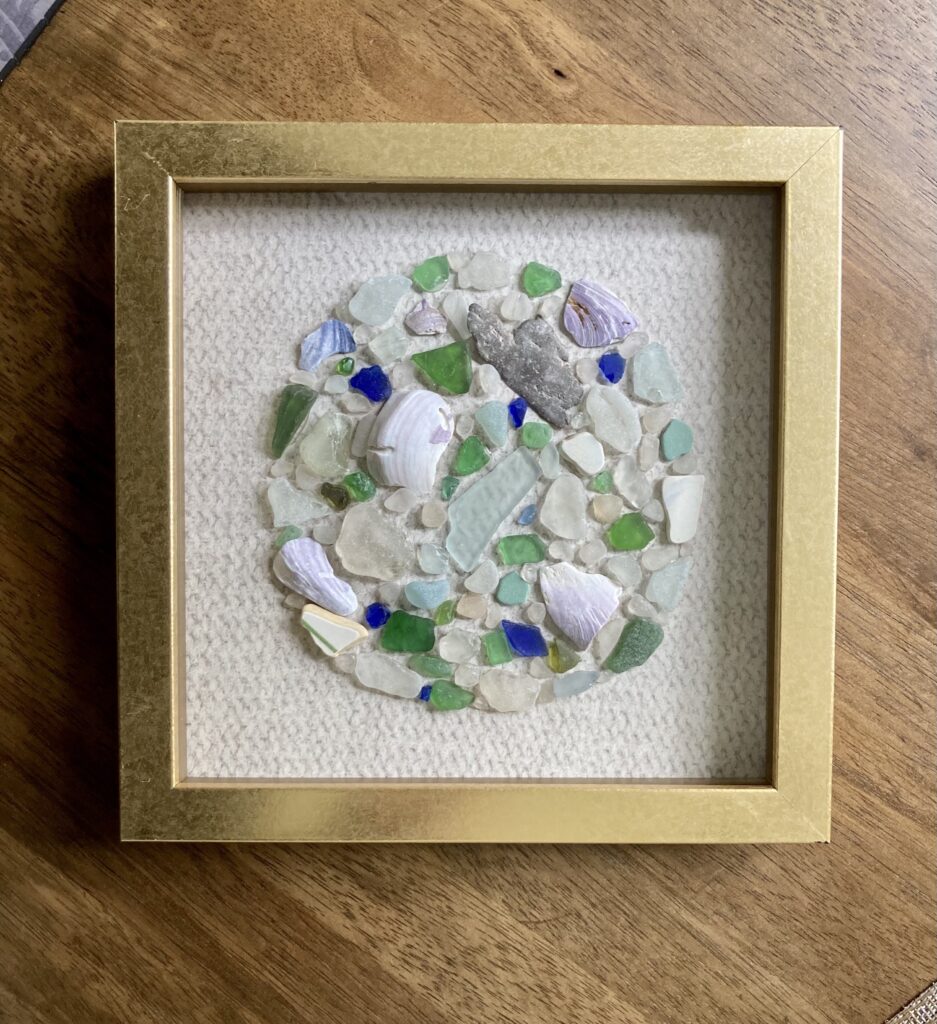
Once your art has fully dried, it’s ready to be framed! I recommend removing the glass pane and cleaning, front and back, prior to using it. Your art will look so much better with clean glass.
Pop in your cardstock, and you have a festive delight to gift, or to keep for your own home.
Thanks for stopping by today to check out my post.
One of the most peaceful hobbies I have is beachcombing. For many years, whenever I’ve been near a beach, I would be found digging for natures treasures, taking shells and other finds home for “future projects”, many of which never really materialized.
In 2020 I began combing beaches for seaglass, which is one of my favorite things in the world to do. Sitting on the beach, often barefoot, with just the sound of the gentle waves rolling in…..heaven!
Recently my partner and I traveled to the Dominican Republic for a week at an all-inclusive resort. We enjoyed walking the coastline every morning, catching the early sun. Of course, we couldn’t resist gathering a few treasures to bring back with us.
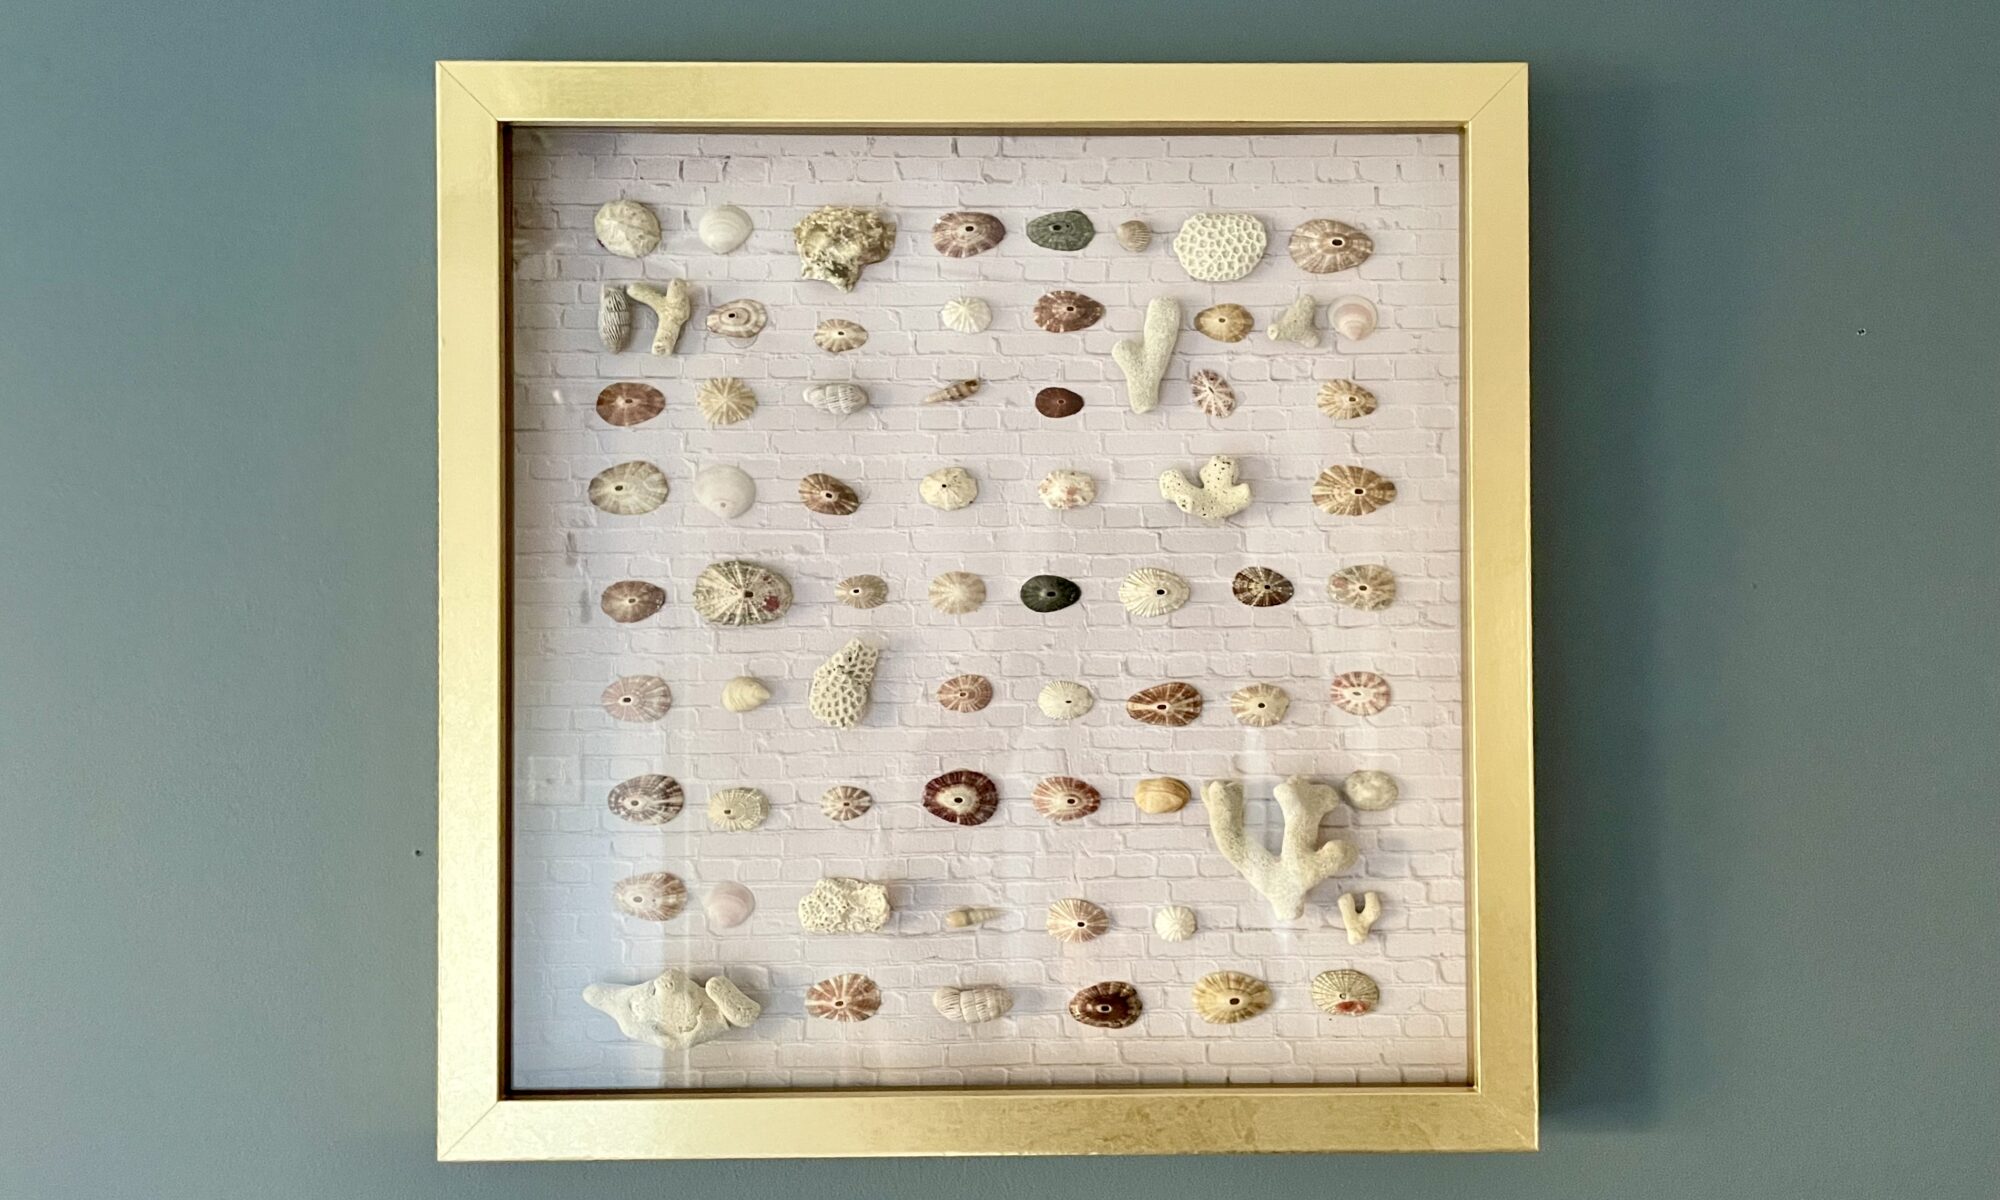
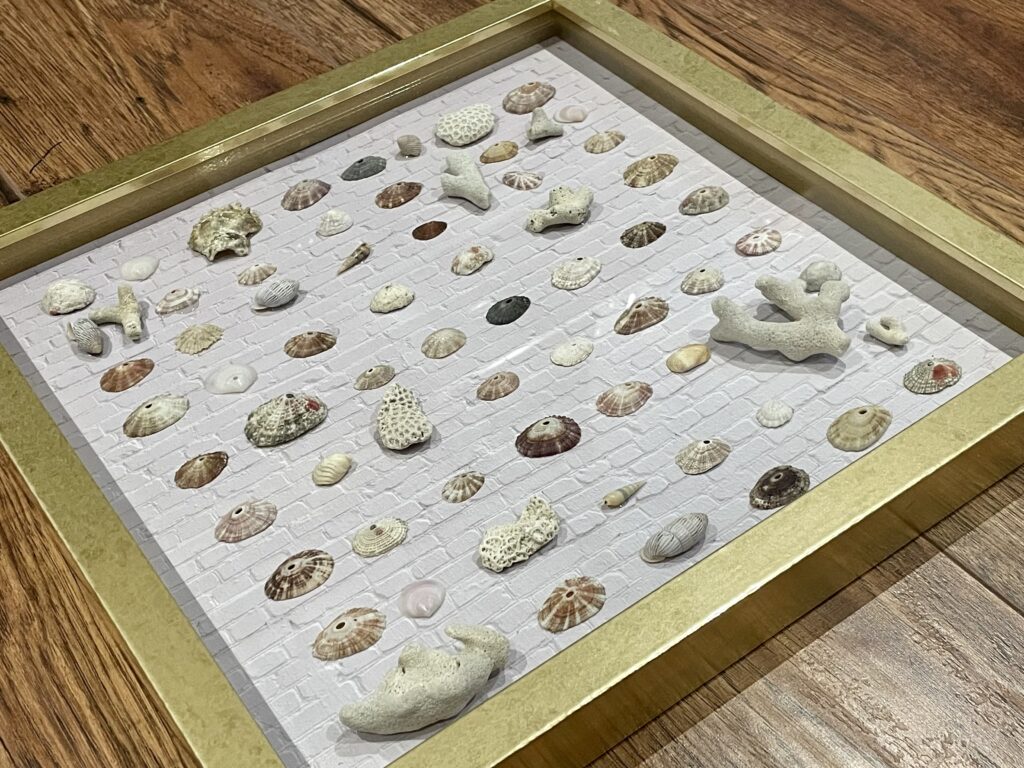
Upon our return, I cleaned all of these empty shells and dried up coral with bleach solution, as I do with seaglass. I didn’t soak them long, as bleach can make delicate shells brittle.
This project is fantastic if you have a passion for beachcombing yourself, or if you are looking to utilize special treasures your kids find (or bring back from trips).
For this tutorial you will need the following:
A shadowbox frame (I used a 12X12″ frame here)
E6000 glue
Clean, dry treasures
Cardstock (I used a 12X12 piece to fit the frame)
I love lightly-patterned cardstock, however you can use plain.
Depending on the size of your shadowbox, you may need to cut your cardstock to fit. I use a Fiskars paper cutter to get a nice, even cut. Make sure to cut your cardstock *before* you start gluing items onto the page.
First you will plan out the placement of your items. I recommend that you work 1-2 inches in from the border of your page. Gently place your treasures on the sheet, but don’t glue them down just yet. You may want to adjust them as you go. Try to balance colors (ie. dark and light) and larger pieces to bring an aspect of symmetry to your art.
When you’re happy with the placement of the treasures, pick each one up individually and place a little E6000 adhesive on the underside, and replace it on the paper. E6000 doesn’t dry immediately, so you have time to make small adjustments. Also be mindful that if you accidentally nudge the treasures, they will likely move.
Once you’ve glued all of your treasures in place, I recommend *not moving the cardstock* until the treasures have had a chance to dry. Dry time is a few hours, but I typically leave them for about 24 hours before framing.
To frame, take the glass pane out of the shadowbox and give it a good clean with glass cleaner, front and back. Frames normally aren’t totally clean when you get them from the store, so don’t skip this step.
Pop your art in your shadowbox and, voila!
Every time I look at this piece, I will remember that relaxing and wonderful trip to the Dominican Republic. This makes a great gift for your travel partner as well!
Thanks for stopping by to check out my post today!
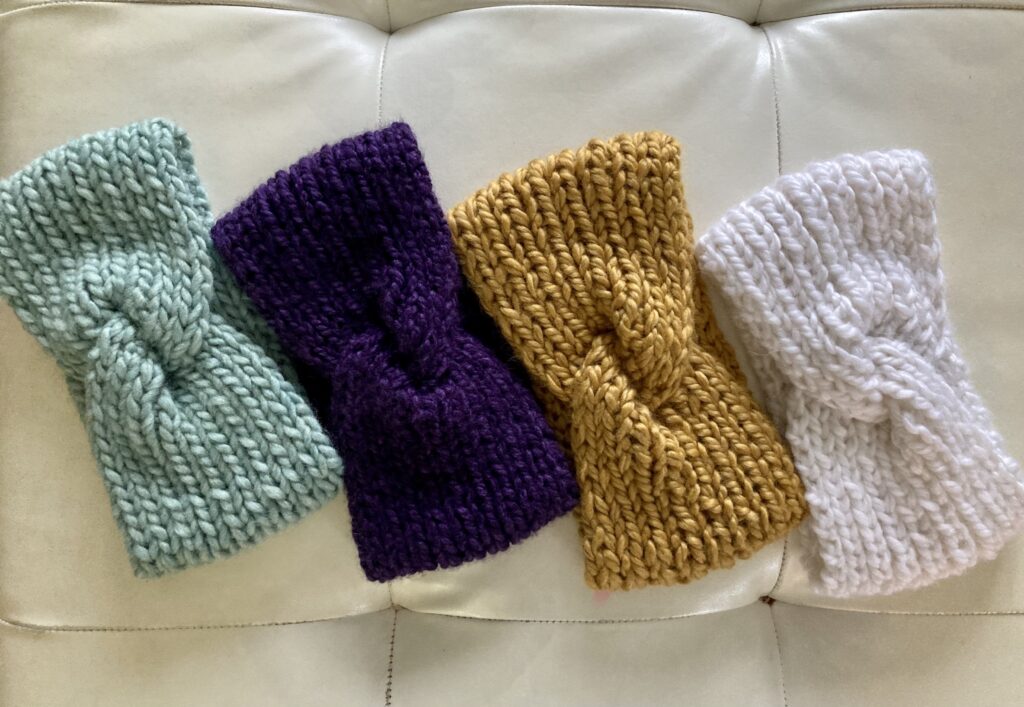
If you live in a cold weather place (which I certainly do), you may be seeing an increase this year in fashionable headwear. Touques seem to be traded this year for ear warmers, and I’m here for it.
A few years back I found a pattern for a cable-knit headband and I absolutely loved it, but I will admit the band wasn’t quite wide enough.
Over the holidays I picked up my knitting needles for the first time in months. I had been looking for a pattern for a knit twisted ear warmer but I was mostly coming across crocheted ear warmers, and I am absolutely terrible at crochet.
I pulled out my measuring tape and began sizing things up. After just a couple of iterations I happily landed on a no-fail pattern. I’ve made this about 15 times now with slight variations in the yarn, and they have all turned out great.
For those who love the look but don’t love to knit, I do have a number of these for sale right now on my Etsy page.
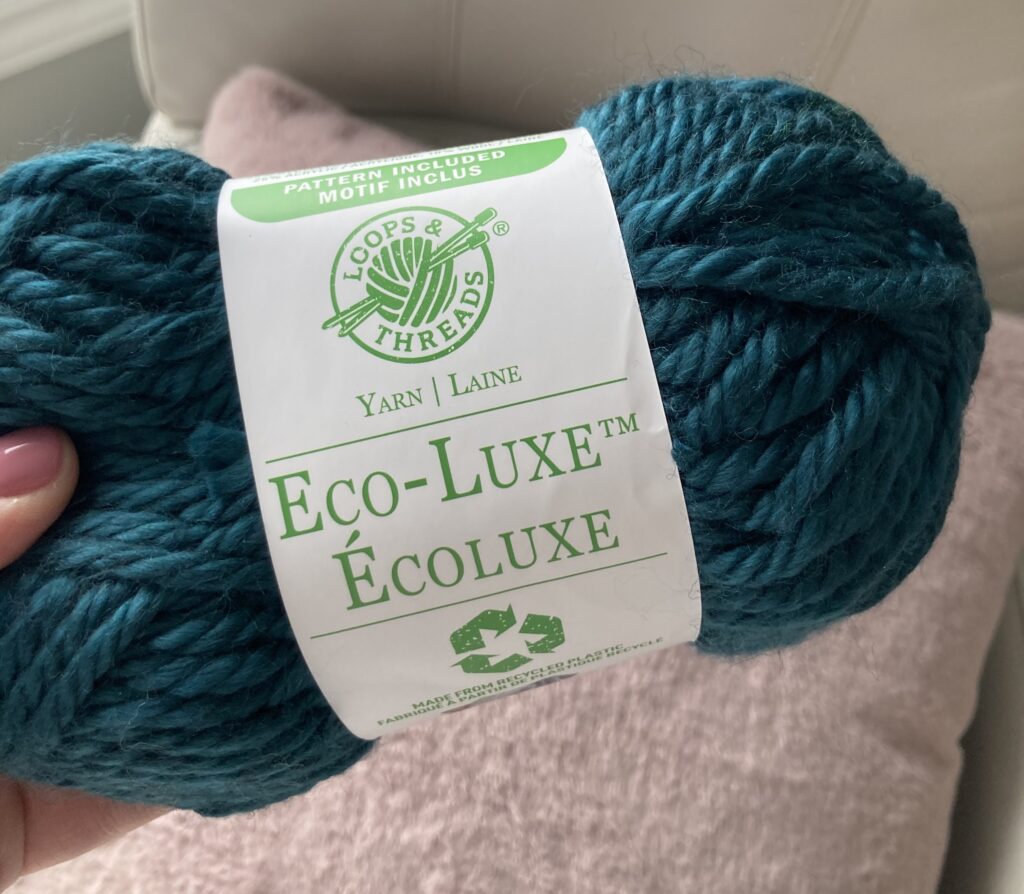
I’ve used a variety of yarn from Michaels, but I tend to enjoy the color variety from Loops & Threads or Lion Brand.
Loops & Threads Super Bulky yarn in Teal
Materials needed for this project:
9mm needles
Super bulky yarn
Darning needle
Measuring tape
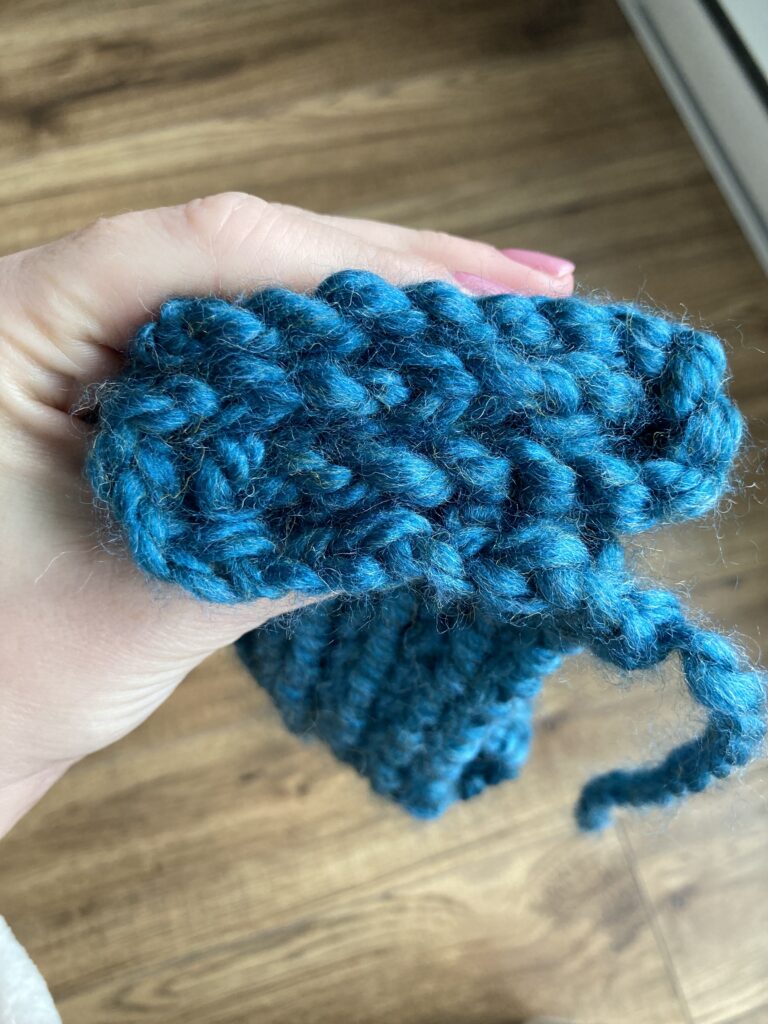
To get started I cast on 18 stitches. Just two stitches form this pattern, the purl (P) and the knit (K). I followed the below pattern:
Every row you start you will start with a Purl. This creates a ribbed look.
I followed this pattern until the knit fabric reached 20″ long, then I cast off, leaving the tail of yarn about 10″ long. Take your darning needle and thread it with the tail of yard from your cast off.
Next you will want to lay out flat the full rectangle you’ve knit. You are going to fold over the ends of each, with corners all facing up. Next you want to bring all of the corners together, layering them like this:
Ensure you have all corners aligned with the rest of the edges (as they have a tendency to curve away a bit), and knit through the stitches as close to the edge as you can.
Flip the ear warmer right-side-out, and it’s ready to wear!
I’ve been wearing these for the last few weeks on some pretty cold walks and days at the playground with my son, and they have kept me SO toasty warm! The knit is thick yet has lots of stretch.
Thanks for stopping by today and checking out this tutorial.
If you have kids and you live near water you might just have jars and containers full of “sea treasures” lying around your house. Shells, driftwood, seaglass, sand and other randon findings are plentiful around my house – somewhat because of my son, and definitey somewhat because of me!
These findings can be pretty special to kids and parents alike. I am always looking at ways to incorporate our findings into permanent fixtures in our home.
This project is really versatile and can be done with your kids treasures, your own treasures, or for sure any little odds and ends around your house. Think about things like loose buttons, paperclips, scraps of paper. Let their imaginations run a little wild here.
The materials you need for this tutorial are as follows:
A shadowbox frame (I use 8X8 primarily but any size will do)
Cardstock
E6000 glue (recommend an adult uses this glue, NOT a child)
Shells, buttons, seaglass or whatever treasures you like (that will fit in the frame)
The shadowboxes I use are from Michaels, and I buy them in packs of 3. I love the gold frames, however you can get silver or woodgrain as well. You can also spraypaint the frames if you had a specific color in mind.
To start, find a piece of cardstock you love. I used to use plain white cardstock, and then I found cardstock that was a little textured and I fell in love. You will want to cut your cardstock to the proper size (to fit inside the shadowbox).
If you’re using seashells, I recommend cleaning them a day or two before attempting this project. To clean shells I use a bleach solution (water and bleach, about 10:1). I soak the shells in the solution overnight. Rinse them with clear water the next day, and lay them on a towel to dry. Ensure your shells are fully dried before attempting to glue them. You can clean seaglass the same way.
You can make whatever shape you like, however for this tutorial I stuck with a circle.
I start by making a rough outline of the shape using the objects I will later glue in place. Once you’ve made a rough outline, take a photo of it. If you’re happy with the shape in the photo, you’re off to a good start! Adjust as needed.
Once you have the desired outline in place, glue those pieces down using a little E6000. The glue doesn’t dry immediately so you can move it around a little once you’ve laid it in place. But you can also unintentionally move it if you aren’t careful 🙂
Fill in the circle with shells, glass, etc. Keep filling until the circle looks full. Ensure you are balancing colors as you go. You don’t want all white glass on one side, for example. Make sure you’re evenly distributing color.
Once the shape is filled in, it’s time to set it aside to dry. I like to take a book or a piece of cardboard and slide (don’t lift!) the cardstock onto a flat surface to dry. I normally let them dry overnight.
Once the glue is fully set, it’s time to pop your art in the frame. I clean the glass (front and back) so I don’t have to take it apart again later. Pro tip 🙂
Now your wall art is ready to hang!
PS. They make great housewarming, Christmas, Mother’s Day, etc gifts too!
Thanks for checking out my post today, and happy gluing!
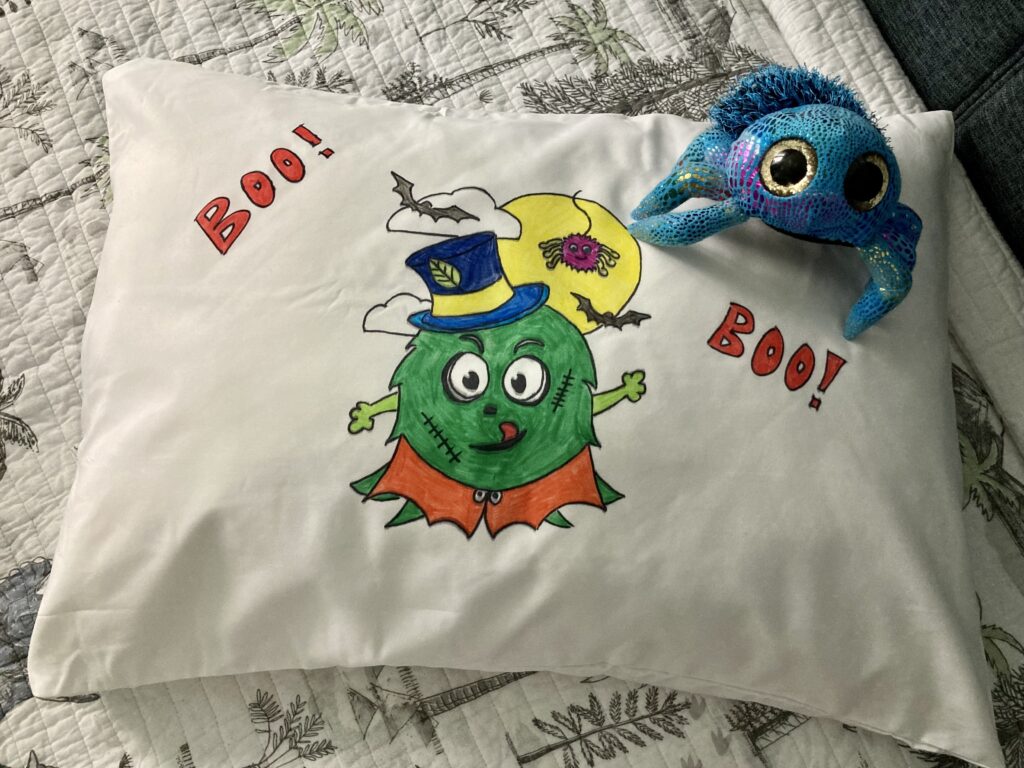
Many years ago I came across a project that has stuck with me since I was about 12 years old. It’s a project I’ve made many times, for my own use as well as gifts, and I’m excited to share this one.
If your child has a special friend or famliy member that they want to do something kind for, this really is sure to be a hit! This project is entirely customizable and takes about an hour to do.
Here are the materials you will need for this project:
White pillowcase (100% cotton)
Black Sharpie (permanent)
Crayola crayons (not the washable variety)
Wax paper
Iron
Cardboard
Coloring sheet
Tape
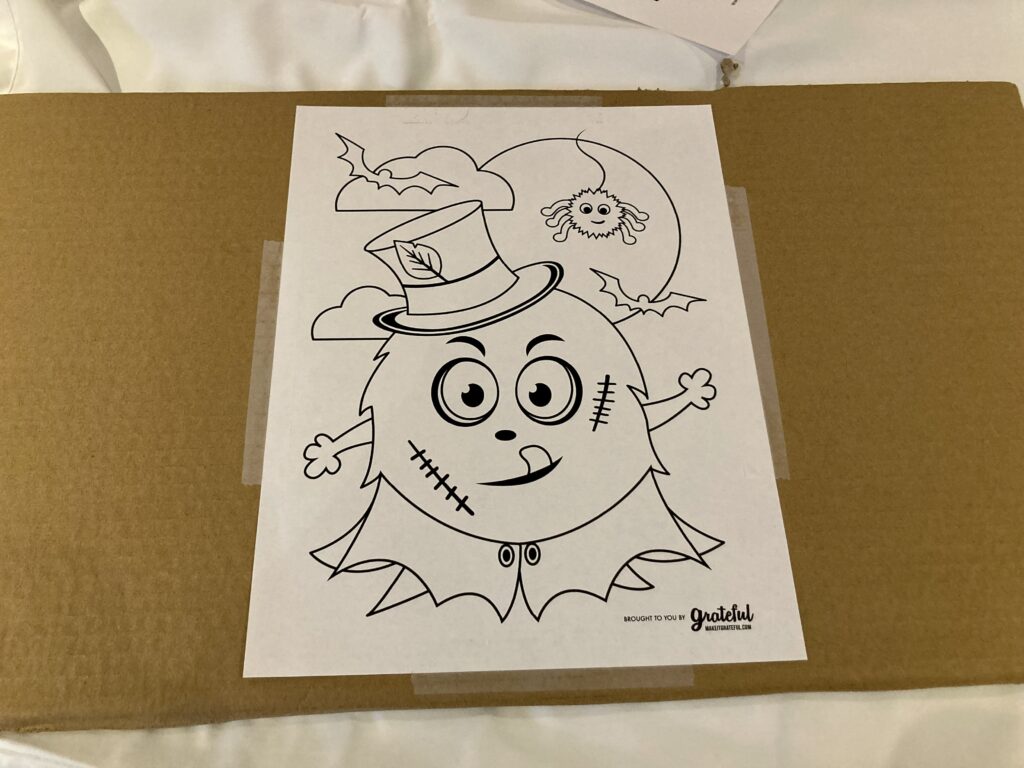
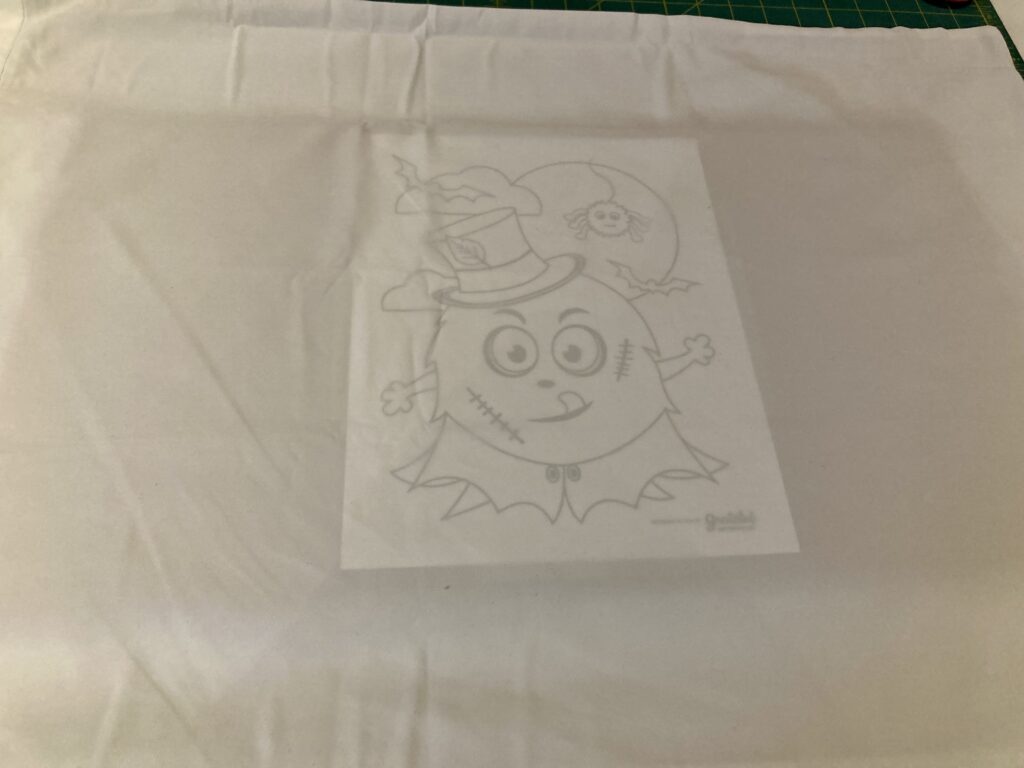
To begin, the child can pick out a coloring page if they wish. You can quite easily print free coloring pages from the internet, or perhaps they already have a coloring book to select an image from. If they prefer to free-hand, that works too. For lettering I suggest using block letters as they can be colored in.
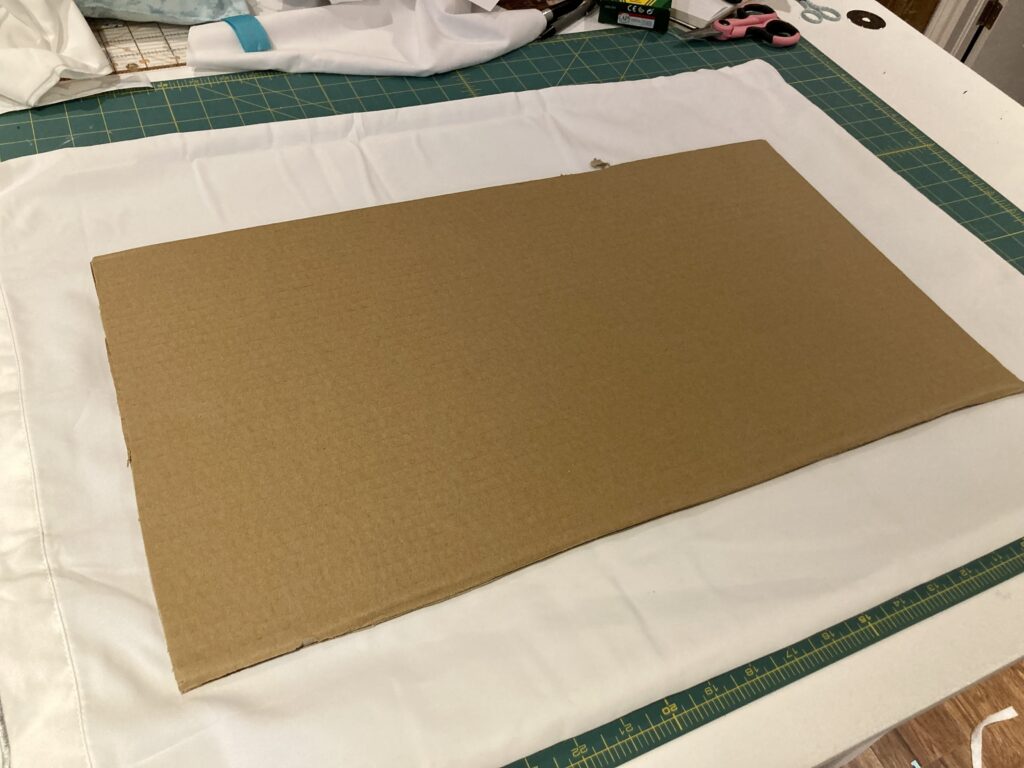
I start by ironing the pillowcase to get all the wrinkles out. Next you need a piece of cardboard that will fit inside the pillowcase, and the cardboard must be at least as large as the coloring page (or the drawing area). You need the cardboard to prevent the ink from running through to the opposite side of the pillowcase. And hey, if your kiddo enjoys this project they just might want to decorate both sides!
The next step is optional but I do find it very helpful. I tape the coloring sheet to the cardboard. This prevents the page from shifting as the image is traced.
The next step may require adult supervision, depending on the child and their age. You will tuck the cardboard (with coloring sheet attached) inside the pillowcase. You should be able to see the outline of the image through the pillowcase.
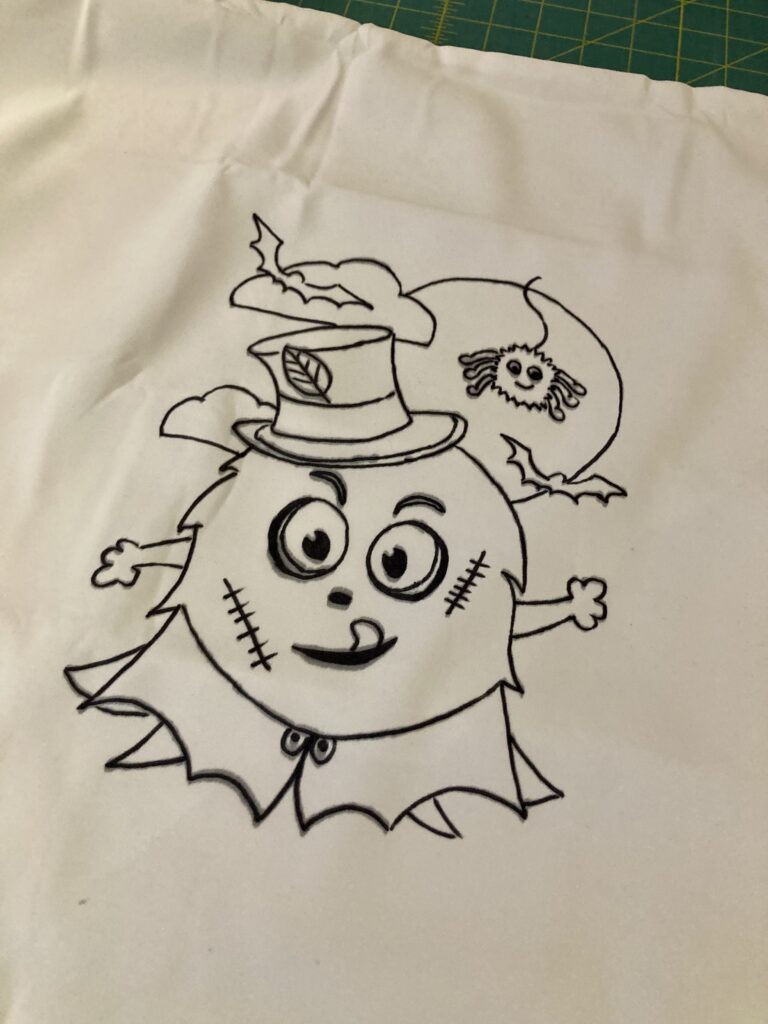
Next you will take the black Sharpie and trace the outline onto the pillowcase. Try not to press too hard as it can lead to “bleeding” ink. If this happens, you can certainly color over it with the crayons.
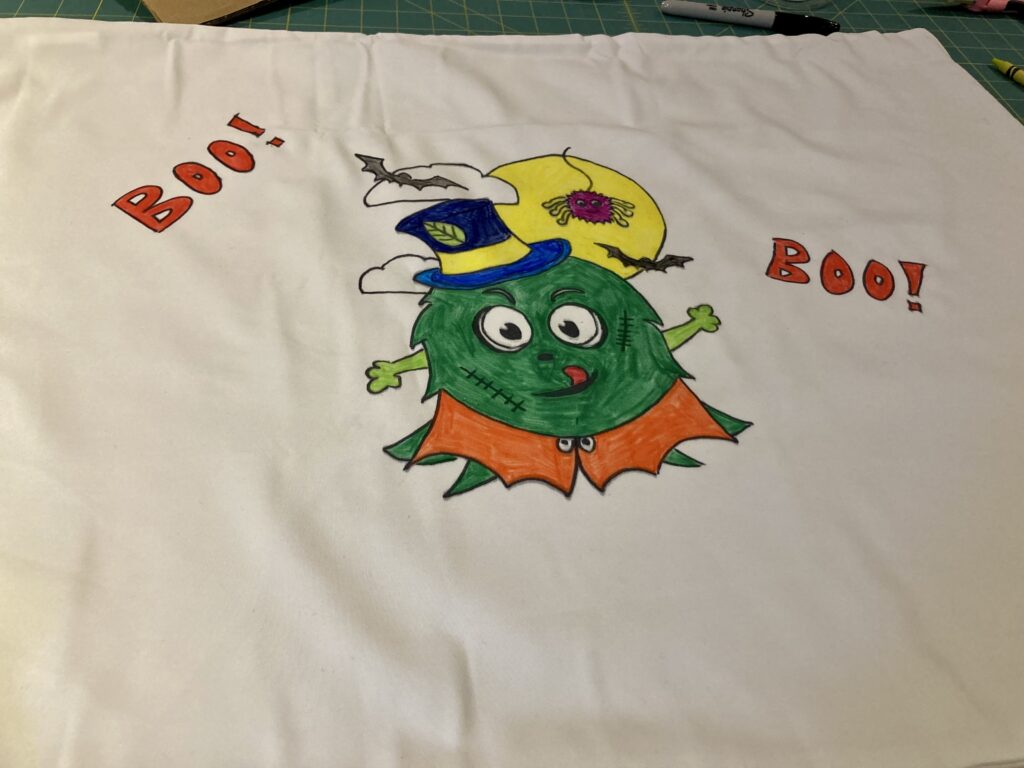
With the image traced out, it’s time to color! I recommend leaving the cardboard inside the pillowcase for this step.
I finished coloring and added a couple of words (freehand, as you can probably tell!) to fill in the pillowcase a bit more. Once all coloring is completed, it’s time to iron!
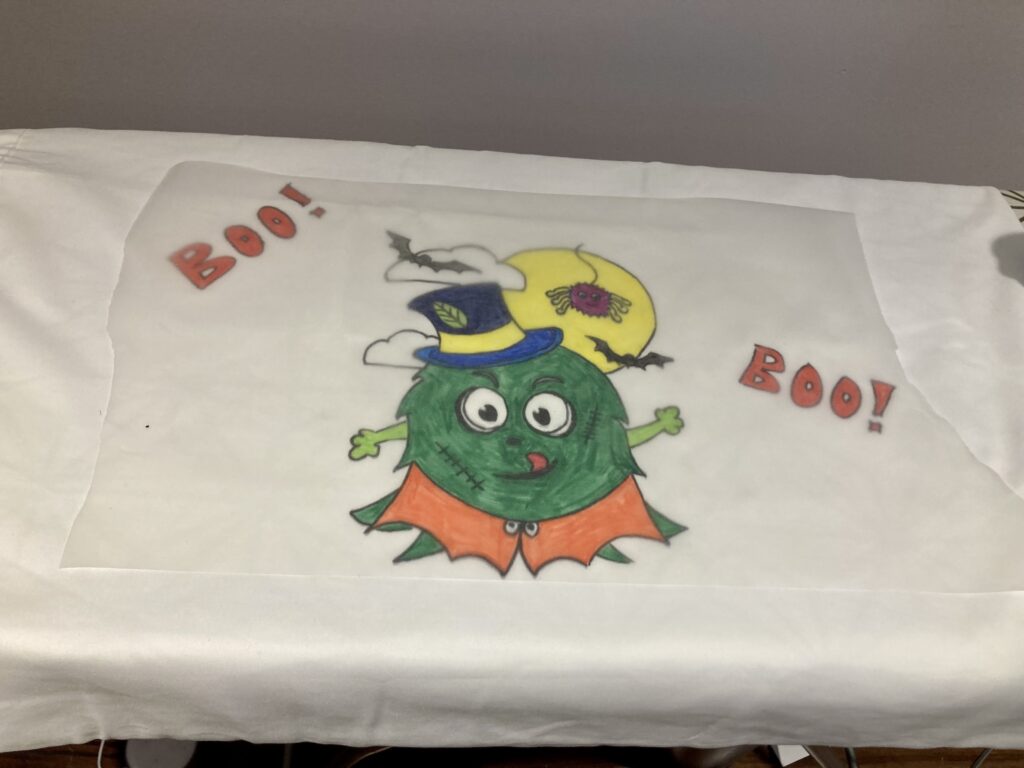
You want to ensure you are placing the wax paper with wax side down (facing the image). As you iron, the wax from the wax paper will transfer onto the pillowcase and help seal in the crayon. If you aren’t certain which side of the wax paper is waxed, scratch your fingernail on each side. The side that shows up white after it’s been scratched is the wax side.
For extra protection, you can repeat that last step and use a second sheet of wax paper. I like to iron slowly and make sure the iron has had time to really seal in the crayon. Do not use the steam setting.
Voila!
This pillowcase should be washable now, though the color will naturally fade over time. The Sharpie won’t, so if you do experience fading you can always break out the crayons and try again!
Thanks for checking out my post today! Happy coloring!
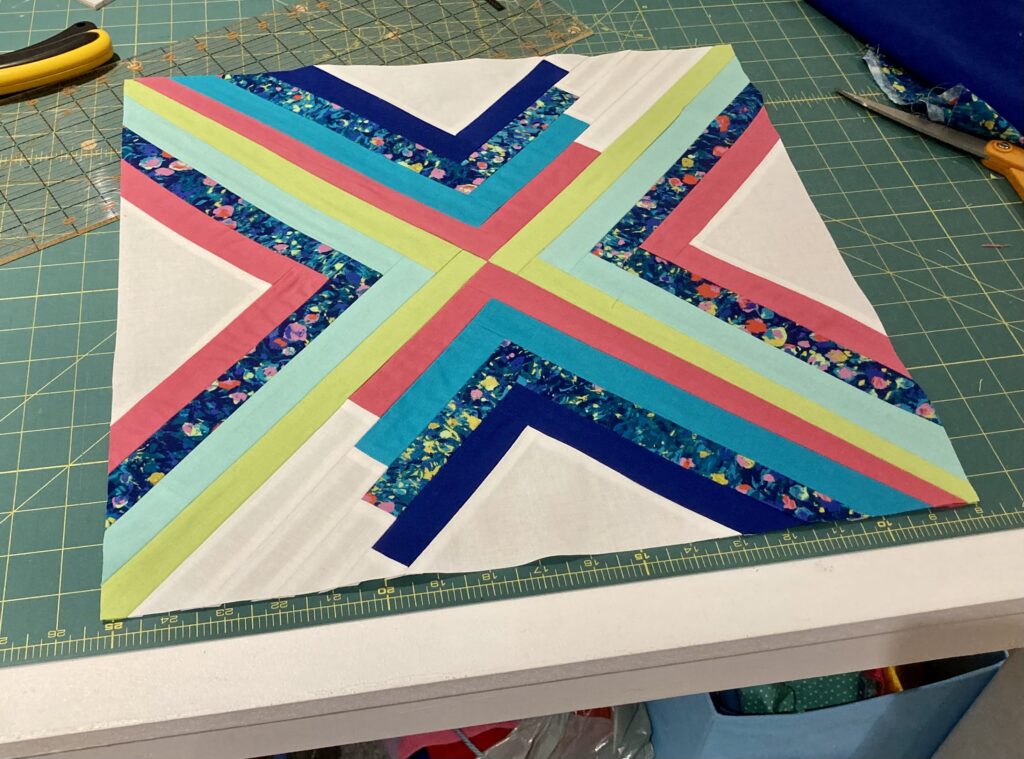
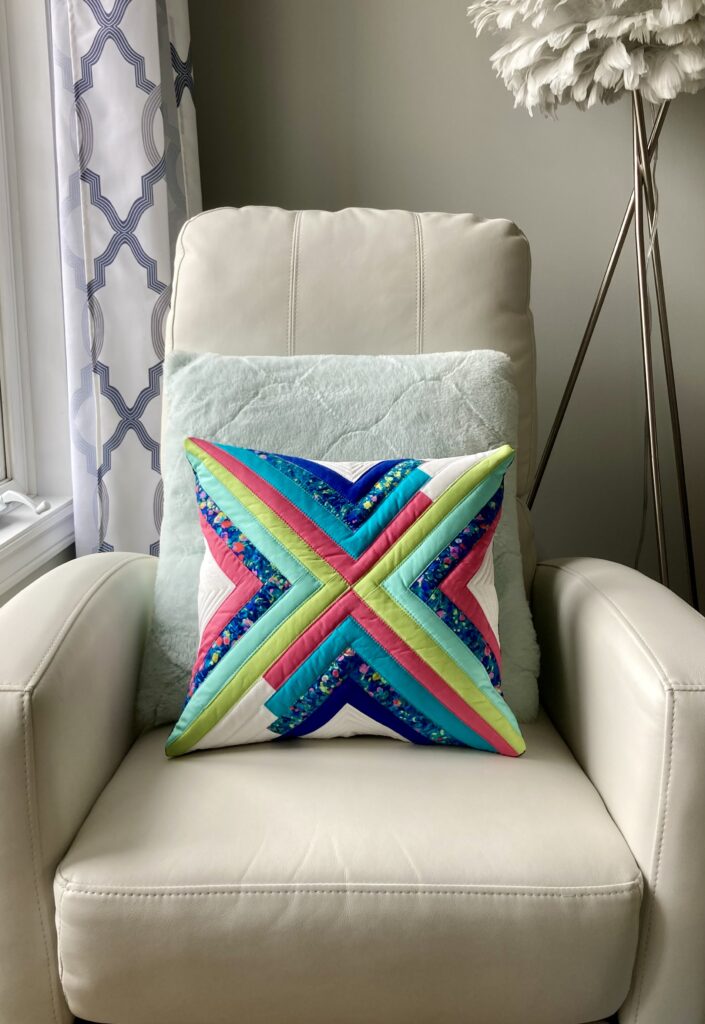
I’ve been hoarding patterns from Suzy Quilts for some time now, with the best intention of finally trying each one out. Life has been busy through the pandemic – working and parenting at the same time can be exhausting, and most evenings I’m too tired to sew. Hopefully we are in the home stretch now and life can get back to (something resembling) normal.
A couple of weeks back I decided to try out the Sugar Pop quilt by Suzy Quilts. I am absolutely in love with this pattern! I am drawn to more geometric quilts – lines, edges, points, etc. I’ve had this pattern for quite some time but it looked a little intimidating. I sometimes get lost in the process of trying to match colors and patterns.
This is a TRUE de-stash quilt pattern if I’ve ever seen one. The pattern comes in 3 versions – pillow, throw quilt, baby quilt.
The amount of each fabric required for any of these versions is minimal, and you get to choose 7 colors/patterns to build this incredible pattern. I went bright and colorful with this creation, but I do think this would look pretty awesome done in all different shades of a single color. Or black, white and multiple shades of grey.
The pillow top pieced together.
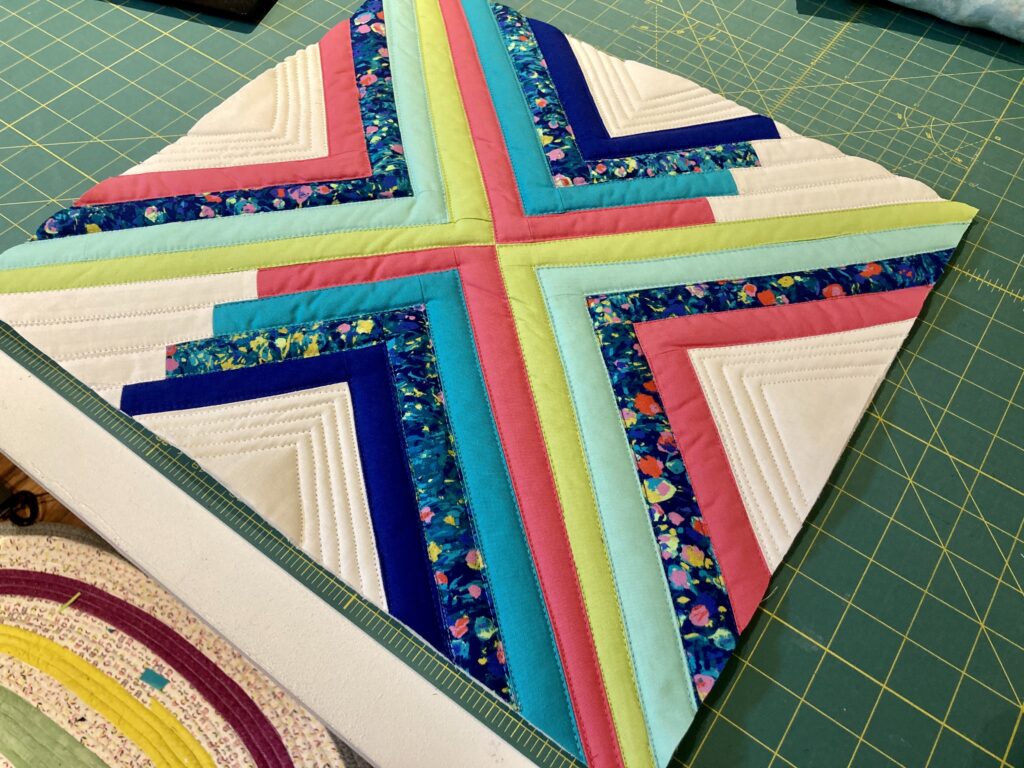
I decided to quilt the top before turning into a pillow. I used two layers of thin 100% cotton batting, and I backed it with a piece of cotton. This didn’t require quilting, but it sure turned out well.
The quilted pillow top.
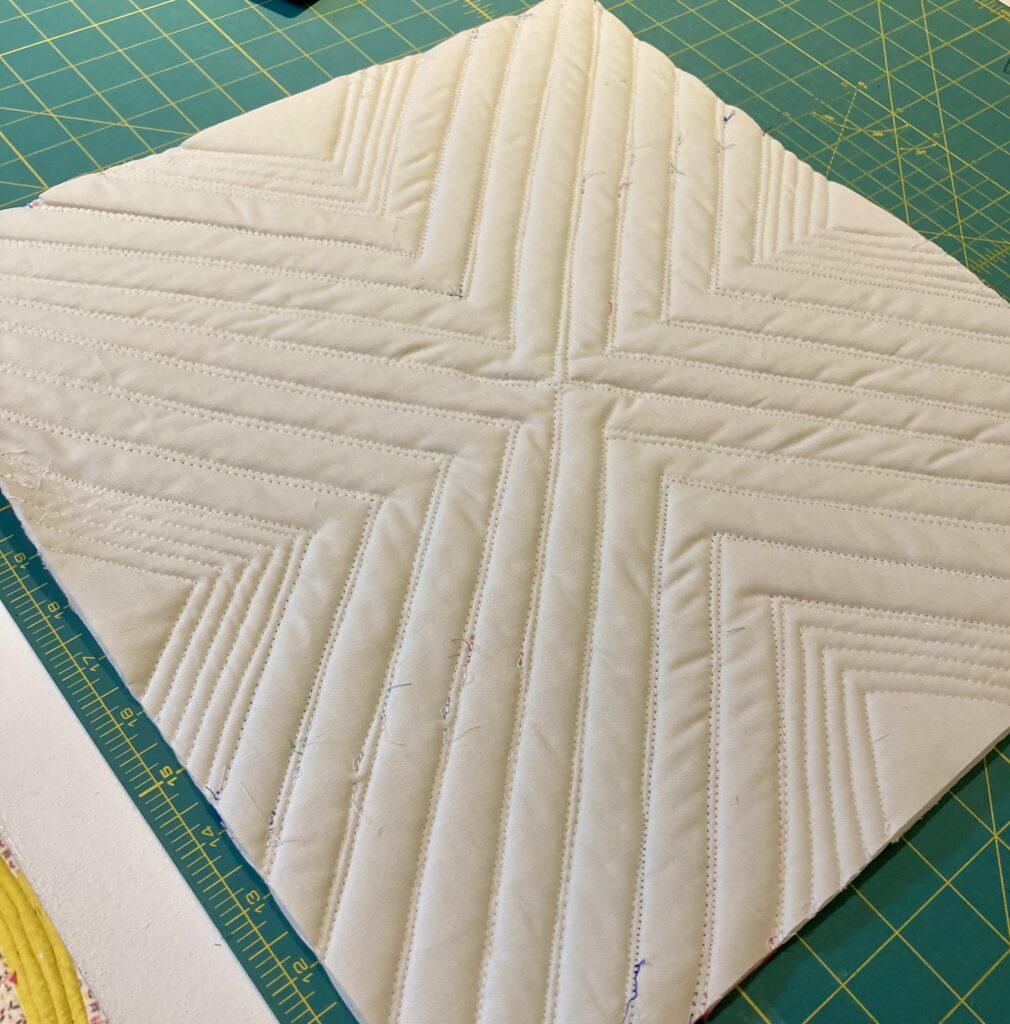
Here’s a quick look at the back, so you can see how much quilting I did.
View from the back.
I turned this into a pillow by using a little medium weight denim on the back (with polka dots!)
The finished product!
I have the throw blanket (top) completed but it’s not assembled with batting and backing yet. Looking forward to having both of these beautiful pieces displayed on my couch in the coming weeks!
Check out Suzy Quilts for more adorable patterns available for instant download.
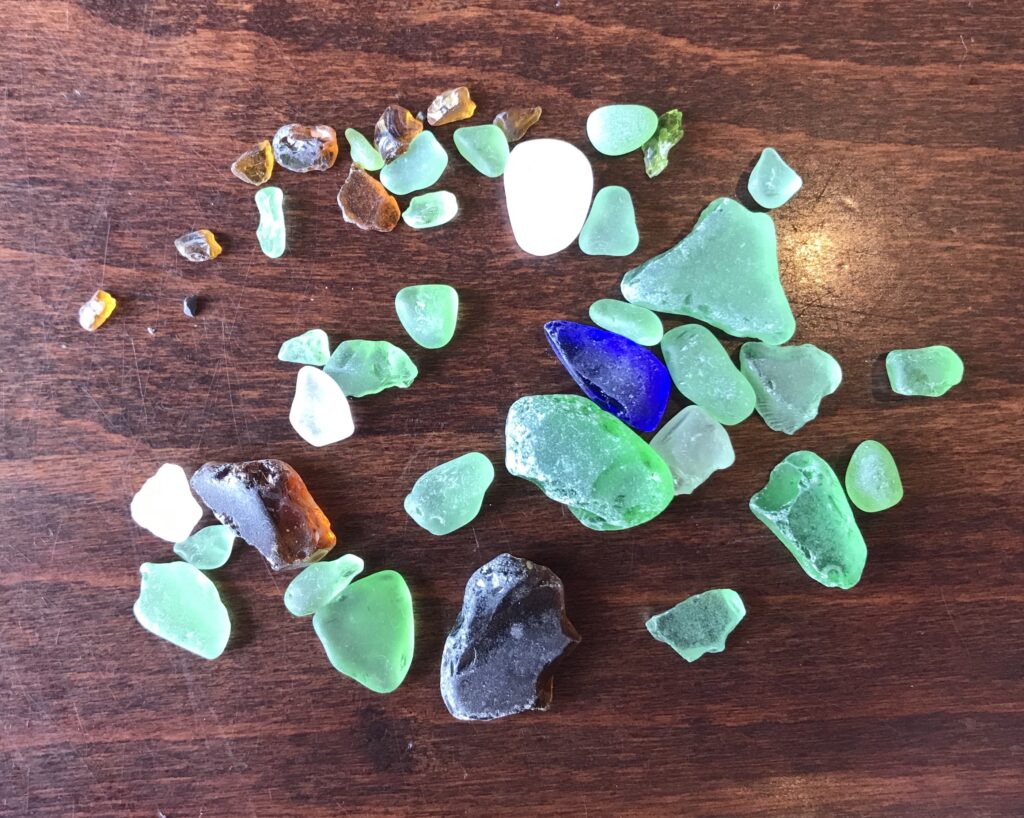
Well, this is a post I’ve been wanting to make for quite some time. In July I was playing around on a random beach with my son, finding shells and enjoying the salty air, when I came across a very small piece of green seaglass sitting among the sand. I had never found seaglass before, but I immediately wanted more! We visited the same beach the next day and didn’t find a single piece. I asked around about seaglass beaches in the area, and I was advised to “look for rolling waves”.
Within a few days, a friend and I were out scouring beaches in Bay Bulls, finding little nuggets of glass among the beautiful shorelines.
We did this a few days a week, mostly finding small pieces in green, white, brown and sometimes indigo.
Since that time, our weather has been cooperative and I am still seaglass hunting well into February! We have expanded our search zone a bit, and the payoff has been huge! I attribute that to the winter months not being seen as the ideal seaglass hunting weather, and I think getting out of town to more sparsely populated areas helps as well.
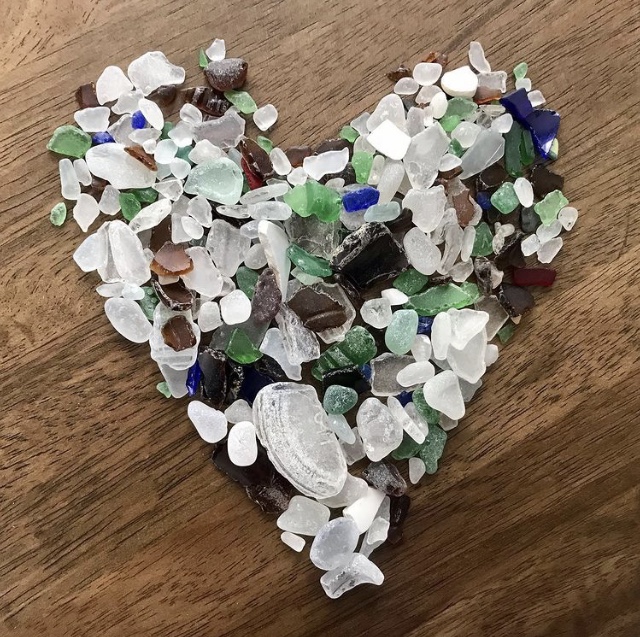
My mom kept asking, “What are you doing with all the seaglass?”, and the best I could say was, “I will make wall art out of it some day.” I dreamed up projects but they never really came to life. Truth is, finding seaglass, cleaning it and just admiring it was almost enough for me. Almost.
There are different types of glass that can be found on the beach, ranging from perfect, cloudy, rounded pieces of traditional seaglass, to more jagged, clear pieces of beach glass. At one point I was collecting beach glass, before really realizing it wasn’t exactly what I had in mind. I purchased a very simple rock tumbler and got some gritty sand from the beach. Dampened the sand, threw in some beach glass, and tumbled it for a couple of days. The glass came out nice and cloudy.
Some people make cloudy glass from scratch by breaking up bottles (using goggles, gloves, etc) and tossing it into a tumbler for a few days. I prefer the traditional way of finding glass, but if you find glass that’s not quite cloudy enough, no harm in tumbling it for a day or two until it’s usable, IMHO.
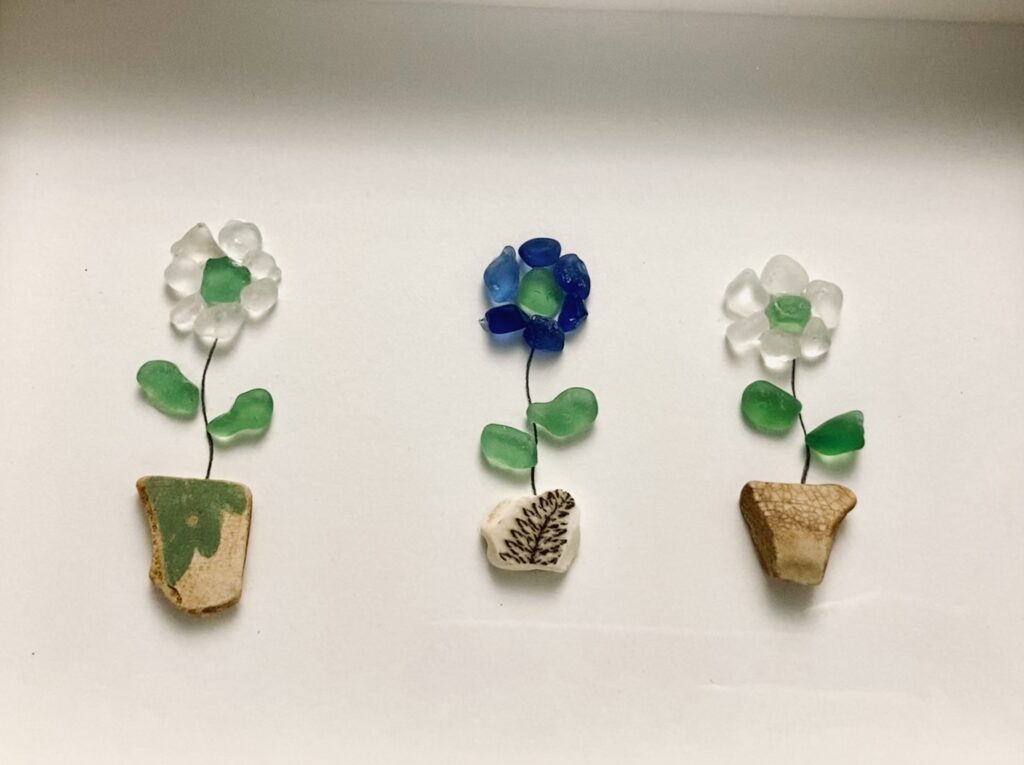
To start, cut your cardstock to fit the shadowbox. If you have a 5X7 frame, cut your cardstock 5X7. I use a paper cutter to get nice, straight edges.
I laid placemats on the table prior to gluing, mostly just in case glue soaked through the cardstock. I would recommend this for sure.
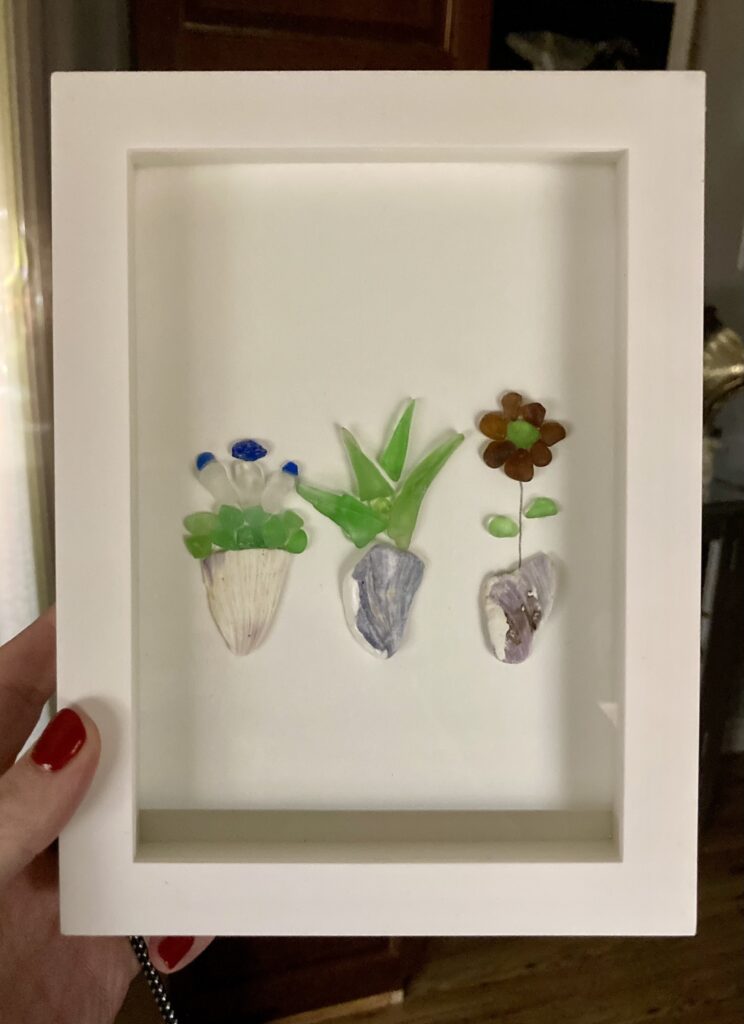
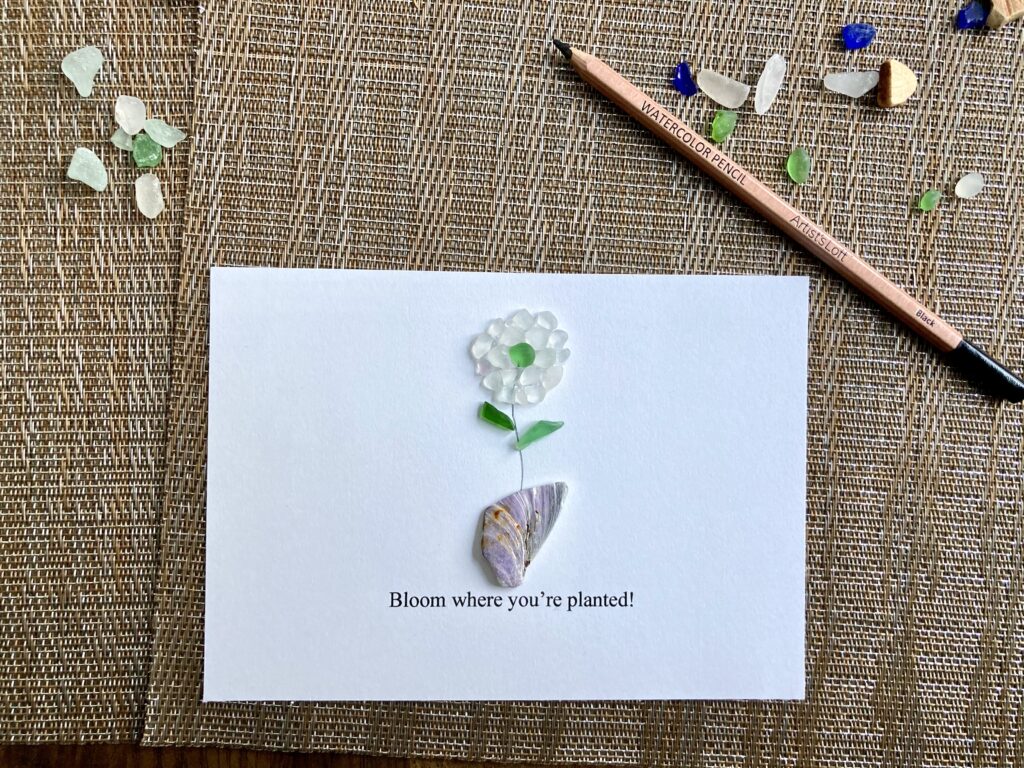
Lay out your seaglass on the cardstock in the pattern you choose. If you’re doing flowers (like I did, to start), lay out your glass, figure out where you want the flower stems, and just slightly move the glass out of the way to draw the stem before you begin gluing.
Once your pieces are laid in place, lift one at a time and place a dab of glue on the underside. Gently lay in place. Most adhesives will take a little time to fully set, but try not to move it around once it’s laid.
Continue gluing pieces until finished. Lay entirely flat to dry.
Sometimes you’re lucky enough to find little pieces of ceramic plates on the beach, as I did here. I used them for flowerpots. You can also use rocks or seashells.
Shadowboxes really help these pieces look complete. They also protect from dust and dirt, as you can imagine these cardstock pieces will not be entirely easy to clean.
This one was made with seashells my toddler picked on the beach. I cleaned them thoroughly with bleach and dried them, loosening debris with a soft toothbrush prior to gluing. Ensure the glass and shells are entirely dry to ensure they adhere properly.
The best advice I have when you’re looking to make seaglass art is to work with the pieces and shapes that you have. And definitely come up with a little stockpile before attempting to create. It’s addictive so you might as well buy 10 shadowbox frames now and save yourself the trips to Michaels. Most of the frames I’ve used are 5X7 but I do have a bunch of 8X10s as well.
You can incorporate things like twigs, pearls, beads and rope into these pieces quite easily. They are fun to make, and you can let your imagination run totally wild. Finding treasures along the shorelines with your children and letting them transform their finds into art is a fantastic way to foster creativity.
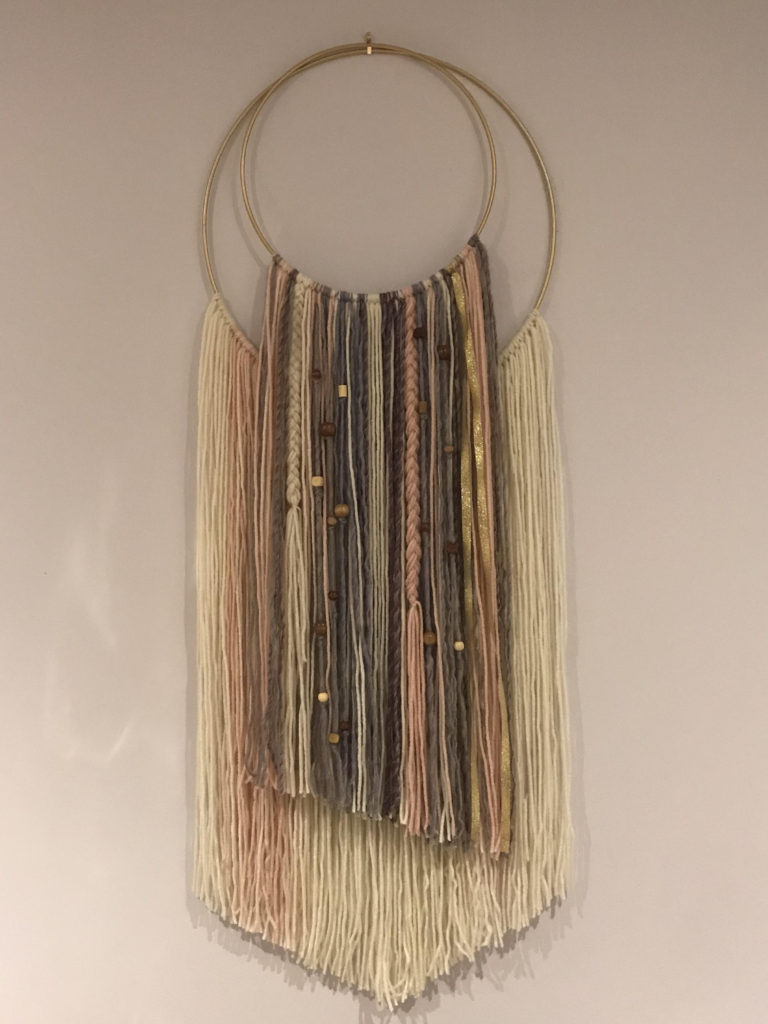
In July I moved into a new-to-me home, which has brought on a lot of opportunities to get creative. I’ve been spending my time painting and making new decor like throw pillows and, now, a wall hanging!
I kept seeing these boho style wall hangings and, though they don’t fit my usual styling, they do certainly have a place in my home – my craft room!
This project is fun, easy, and can be done with older children for sure. It’s inexpensive and you can let your imagination really run wild. I’ve seen other additions of flowers, feathers and lace.
My version was quite simple, though I will say I have another in the works that may end up being a bit more elaborate.
Materials needed for this tutorial:
– A hoop (or two) – Various colors of yarn – Scissors – Wooden beads
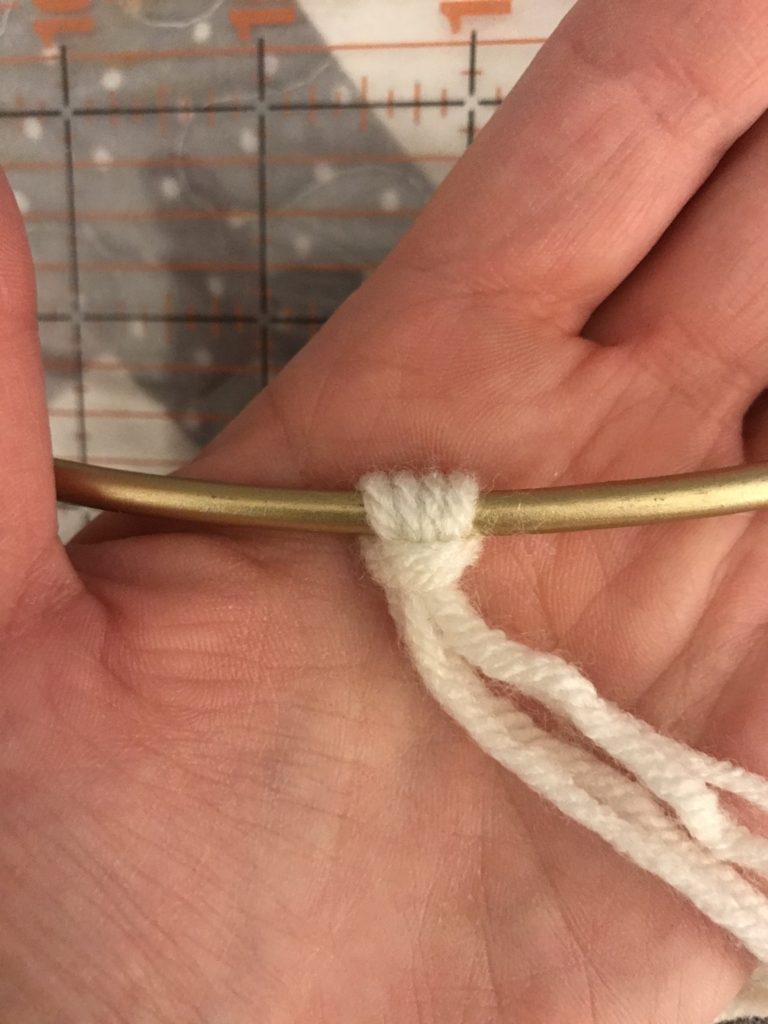
I picked up gold and silver hoops at Michaels for less than $5 each. They had several sizes to choose from, and I wanted to use two hoops for this hanging so I grabbed two different sizes in gold.
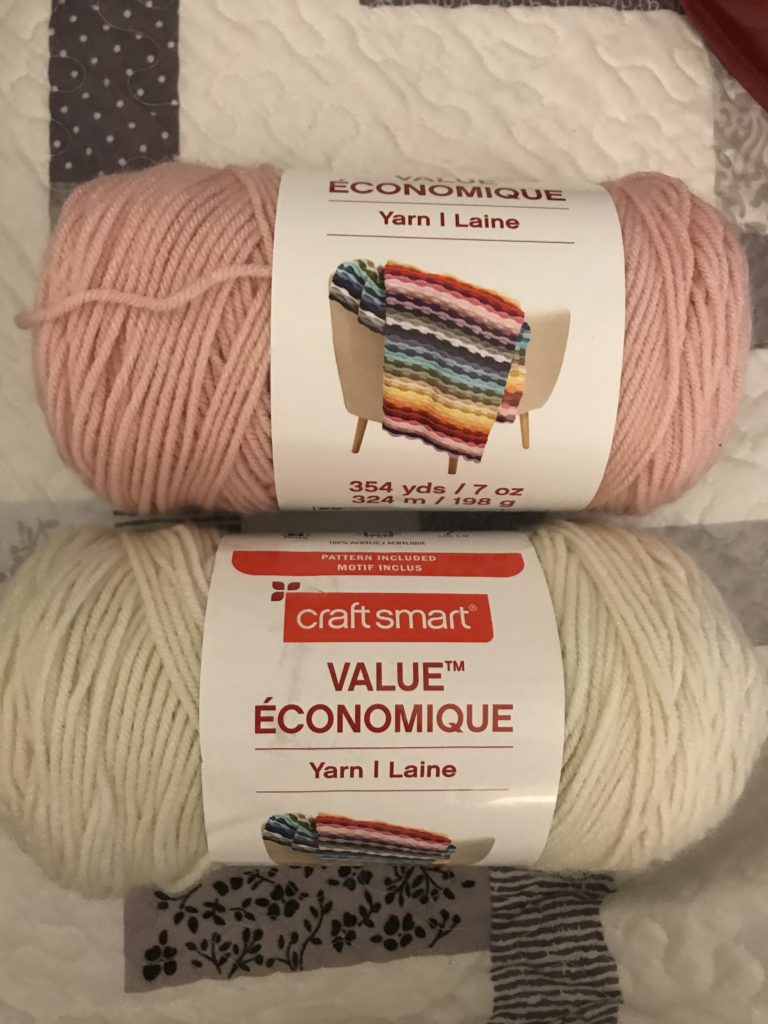
I have a stockpile of yarn at home, but I did grab some ivory and blush pink for this piece. I knew I wanted faded pink, purple and ivory, etc. Value yarn works as well as expensive yarn for a project like this. My sewing room is a lavender color so I felt it would match the decor.
I started by cutting pieces of yarn approximately 62″ in length. I knew this would be long and that the strands would need to be cut after assembly, so the exact measurement of each piece is not critical. Just a rough cut at that length.
Once the yarn was cut I hung the hoop on the back of a chair and started adding pieces. I put two strands of yarn together for each loop, but you could easy do 4-5 and it would take even less time.
To form the loops, just fold over your two pieces of yarn, holding the folded section at the top. Place over the hoop, pull the yarn through the loop and pull downward. Make sure that you loop the same way every time.
Throughout this project I did add some braided sections. I put about 10-12 pieces of yarn together, looped them as normal, and then proceeded to braid the sections. NOTE: Braiding will make the section shorter, so you may want to cut slightly longer pieces for the braids.
I hung the hoop up, smoothed down all of the pieces, and then decided where to add the beads. I used wooden beads from Wal-Mart , along with a darning needed (not necessary but surely helpful) for threading the yarn through the bead openings. I knotted below where each bead would sit. You could also do entire strings of beads or large pearls. If you don’t like it, take the individual section off and try again. You really can’t go wrong.
Finally I hung the wall hanging and decided how to cut the bottoms. Lots and lots of options but I went diagonal for one, and v-shaped for the other.
This piece sits on a wall with a lot of locally made artwork I’ve collected over the years, and some artwork I did myself. Simple but pretty, it adds a pop of texture to the wall. Next time I’ll add in lace, more beads and perhaps feathers. For now, I’m enjoying the way the lengths of yarn sway every time I walk past it.
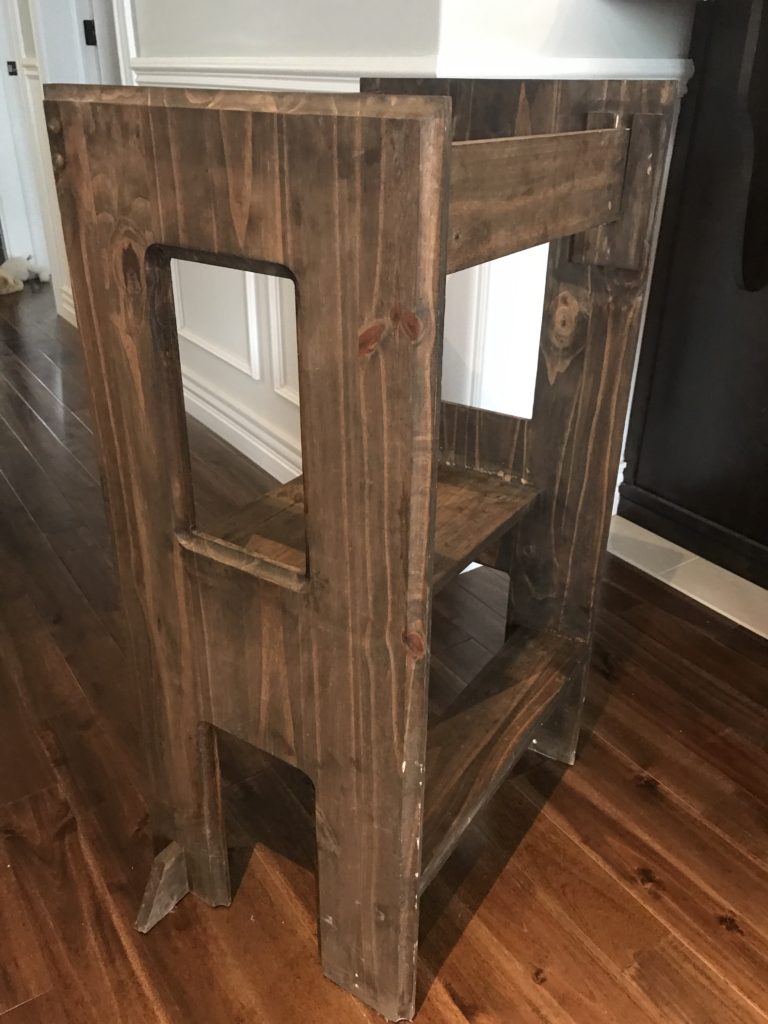
As all cool toddlers do these days, my son has a learning tower. This tower allows him to reach the countertops and sink in the kitchen so he can help with baking, meal prep or dishes. Picture a 3-year old doing dishes while holding the water sprayer…. “helper” indeed.
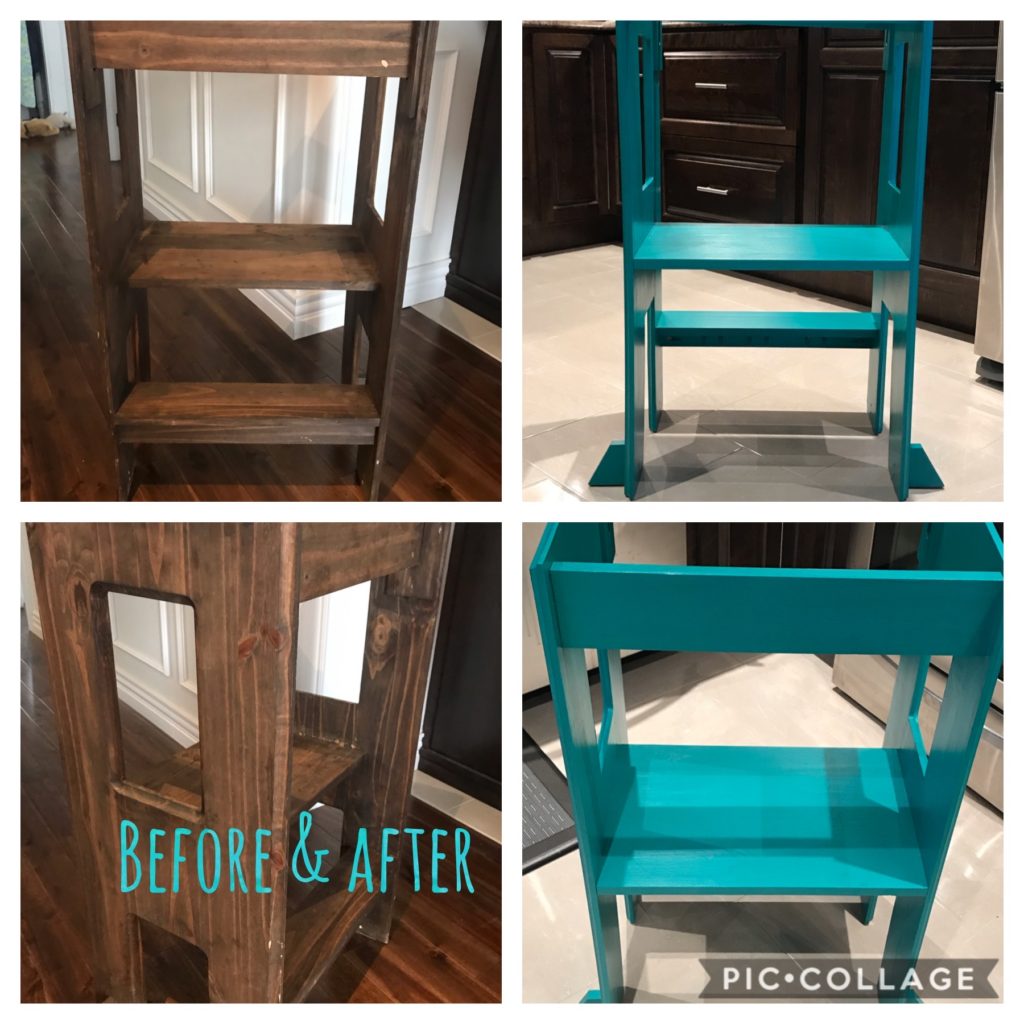
I bought the tower second hand, and it was stained a dark brown color, which matched our kitchen so I thought it was pretty neat. But kids usually love bright colours, and I was really in the mood to paint something. I set out to find a Rustoleum spray paint in a fun color, but the store didn’t have any. The associate talked me into chalk paint.
Before
At the Paint Shop, the associate explained I would need chalk paint, sealer and a special brush. Chalk paint is very dry, not at all durable, and it’s nearly impossible to clean. Learning towers get covered in flour, sugar, butter, etc all the time so they NEED to be washable. The sealer would help there. And the lady at the store swore by the special paint brush to help reduce paint strokes.
I found a really lovely, bright teal paint and an eggshell-finish sealer.
I started by washing the tower with a good cleanser, and then I let it fully dry. I ran over the tower with a dry towel to make sure I got all the dust off.
Chalk paint dries quickly and is pretty thick, so no priming needed. I gave the tower 2 coats of chalk paint before doing two coats of the sealer. I did a coat of chalk paint at dinnertime one day, a second coat at lunchtime the next, and then waited a day between coats of the sealer.
Once the sealer dried, it was ready to use!
Now. Here’s what I have to say about this project:
I don’t love working with chalk paint. I mean, it was okay. But a couple of times, between coats, I would simply touch it with my nail and it would scratch off. It’s beyond delicate.
The top coat was nice to work with, but it remains tacky. When my son steps on it, his feet kinda “stick” to it.
It gave his learning tower a gorgeous pop of color, but next time I do something like this I’m going to test out the Rustoleum line.